New World ERP Human Resources 2021 Year-End Processing Guide
The Human Resources Year-End Processing Guide provides users with a workflow-based approach to year-end processing. The steps outlined in this training guide are designed to assist with the processing of employee W-2s, 1095-Cs and 1099-Rs in New World ERP.
The 2021 forms and transmittal files have been updated to meet federal and state regulations.
A Truncate SSN check box has been added to the Print W-2 Form page:
Human Resources > Year-End Processing > W-2 Processing > Print W-2 Form
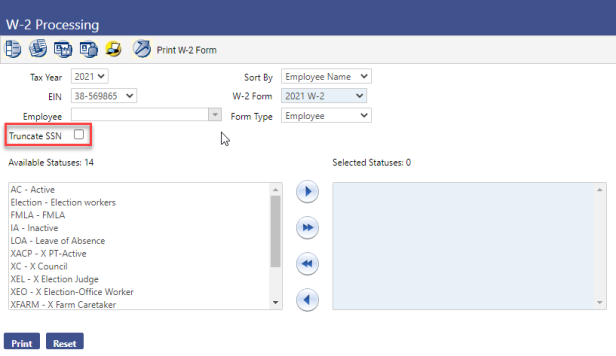
When this check box is marked, the social security number is masked on the W-2, showing only the last four digits.
-
A State of Ohio option has been added to the Local Agency Transmittal drop-down on the Create W-2 Transmittal File page:
Human Resources > Year-End Processing > W-2 Processing > Create W-2 Transmittal
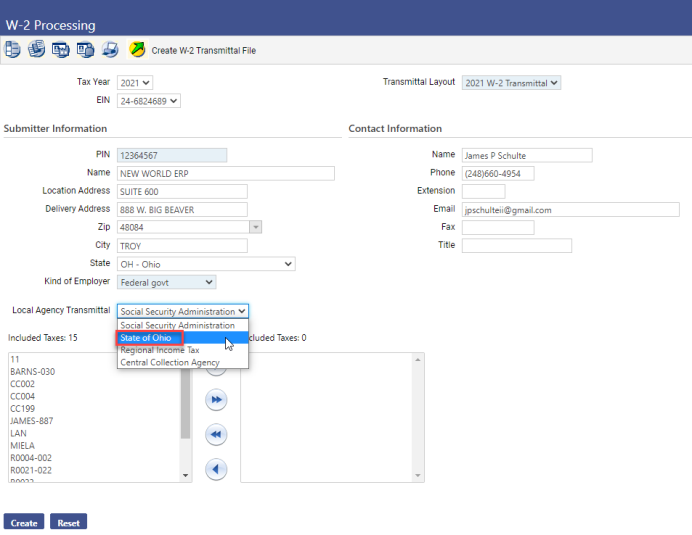
When this option is selected, only Ohio RS39 records are included in the transmittal file. Any employee who is not associated with an RS39 record is excluded.
-
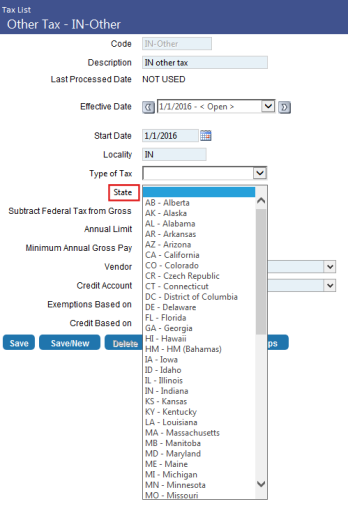
Two new fields, State Control Number and Municipality Name, display on the Other Tax page when OH is selected as the State:
Maintenance > Human Resources > Deductions and Benefits > Taxes > Other Tax Code
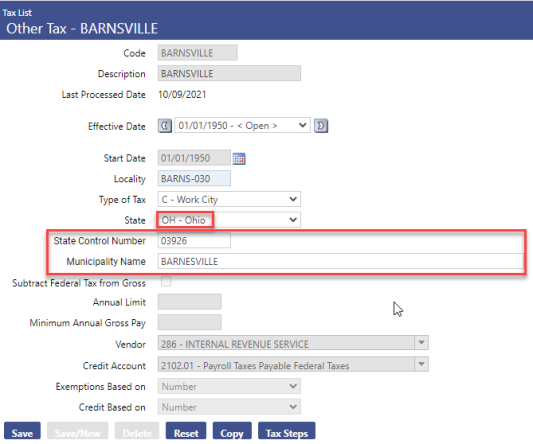
The State Control Number displays in positions 331-337 of the CCA transmittal file and the Municipality Name in positions 338-412. If you are going to complete a CCA transmittal file, these entries are required for each municipality. They are not effective-dated so may be changed at any time.
Following is a list of the tasks to be performed in W-2 processing. Following this list will help to ensure a smooth year-end process:
|
W-2 Processing |
|
|
r |
Order W-2 forms. |
|
r |
For customers on the 2021 release, make sure to apply the year-end processing patch 2021.1.18.1. |
|
r |
Select benefits, deductions, hours codes and other taxes that should be included in W-2 processing. See W-2 Setup for more information. |
|
r |
Generate the W-2 work file using Create W-2 Data. |
|
r |
Review the information for W-2 Company. Review W-2 Employee for any employee whom you feel may have incorrect W-2 data. |
|
r |
Print and review the W-2 Register. |
|
r |
Compare the W-2 Register to the Quarterly Wage Report and the Earnings Register. |
|
r |
Print W-2 Forms. |
|
r |
Create the transmittal file for submission to the SSA. |
|
r |
Run the transmittal file through AccuWage. |
|
r |
Distribute W-2s to employees. |
|
r |
Submit the W-2 information to the SSA. |
|
Other Payroll Year-End Procedures |
|
|
r |
If accruals are rolled by calendar year, roll accrual hours after posting the last 2021 payroll and before posting the first 2022 payroll. |
|
r |
Set up taxes as needed for the new year. |
Before beginning W-2 year-end processing, you should review the company information.
Maintenance > new world ERP Suite > System > Company Suite Settings> Company tab
Verify that the following fields on the Company tab are set up correctly:
- Company Name
- Address Line 1
- City
- State
- Zip
- Federal Tax ID
- State Tax ID
When the Create W-2 Data function is run from the W-2 Processing page, it will pull this information into the W-2 Company Information page. Make any necessary corrections and save the settings.
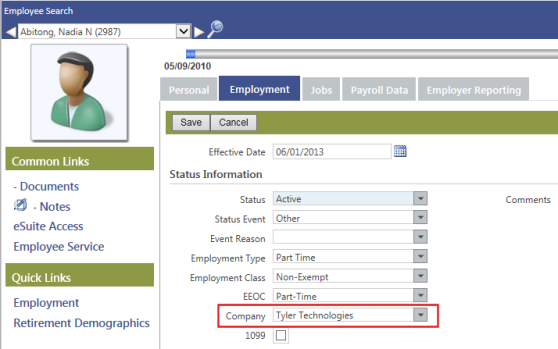
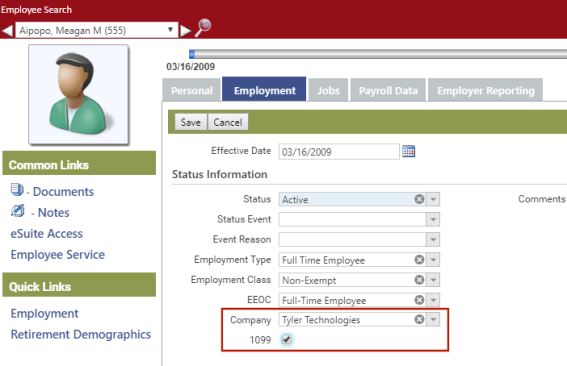
Human Resources > Workforce Administration > Search > Employee > Employment
Unless the user-defined Company field is populated, the employee will be considered part of the company that is specified in Company Suite Settings. To assign the employee to a different company for W-2 purposes, select an override Company and click Save.
Note: The override Company selections come from validation set 377 (Employment Company) in Maintenance. The validation set Value should be the federal tax ID without the dashes. The Description (appears in the drop-down) may be whatever helps you identify the company (see example below).
Maryland requires the ability to separate other taxes (Local Taxes) by state.
If you have employees who pay state taxes outside the state where your organization is located, you need to set up alternate state tax ID values in Validation Set Maintenance.
Maintenance > new world ERP Suite > System > Validation Sets > Validation Set List
- Select the State row (Validation Set 3) and click the Values button.
- Select the row that designates the state where the employee pays taxes and click the Alternates button.
-
Click the New button to add an alternate value. The Alternate Value pop-up will launch:
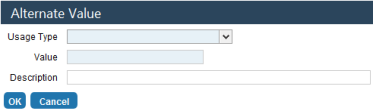
- In the Usage Type field, select the State Tax ID option.
- In the Value field, type the state tax ID exactly the way the state displays it. Include any dashes or spaces that are used. It will print on the form the way that it is entered here.
- The Description value is optional.
- Click OK. This value will print in Box 15 for the employer’s state ID number on W-2s for employees who have a state tax deduction for this state. All other employees will use the default from Company Suite Settings.
No special setup is required if your organization uses new world standard forms. The year-end update will include all the necessary form information.
No special setup is required for the transmittal file. The year-end update will include all the necessary information.
Human Resources > Year-End Processing > W-2 Processing
W-2 Processing uses a work-flow format to organize the steps and allow users to logically step through them.
The W-2 Setup page, accessed by clicking the  icon on the W-2 processing page, allows authorized users to select the benefits, deductions, hours codes and other taxes used for Boxes 10, 12 and 14.
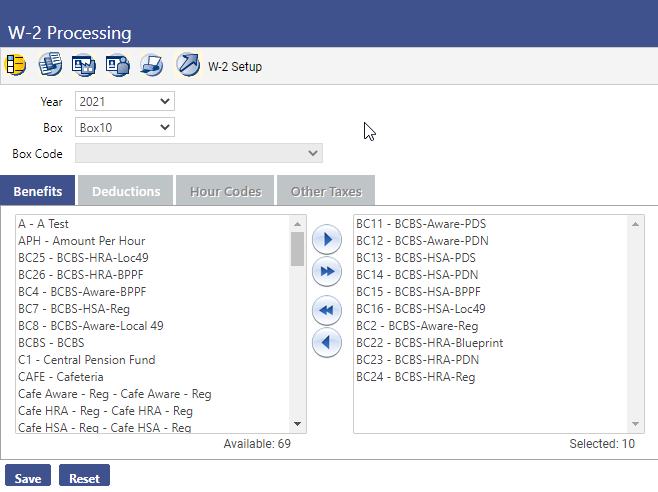
- Select the Year. The current year is the default value.
- Select the Box that you want to set up. The options are Box 10, Box 12 and Box 14.
-
If Box 12 or Box 14 is selected in the Box field, a Box Code can be specified. The Box Code for Box 12 is hard-coded with the allowable values. The Box Code for Box 14 is a validation set and can be set up to contain values needed by the organization.
The Box 12 code for aggregate health care reporting is DD.
The Box 12 code for Permitted Benefits Under a Qualified Small Employer Health Reimbursement Arrangement is FF. Selecting this code enables the Benefits, Deductions and Hours Codes multi-select list box tabs for selections. The Create W-2 process will total the values from these selections and add the total to the employee's Box 12 FF. The amount may be edited on the W-2 Employee page.
If you have imputed income set up for an employee, Box 12 will be populated automatically with the letter C and the imputed income amount.
The codes for Box 14 come from Validation Set 265 (W-2 Box 14 Code) and may be set up by your organization. To add a code to Validation Set 265, hold down the <Ctrl> key, and click in the Box Code field. The Validation Set Values List 265-W2 Box 14 Code pop-up will open, containing a grid of existing Box 14 codes and a New button for adding more.
- On the Benefits tab, select the benefits that should be included for the Box selected.
- Click the Deductions tab and select the deductions that should be included for the Box selected.
- If you are setting up Box 12 or Box 14, click the Hours Codes tab and select the hours codes that should be included for the box selected. This tab is disabled when you are setting up Box 10.
- The Other Taxes tab also is enabled if you are setting up Box 14. You may select other taxes that should appear in Box 14 instead of appearing with local taxes in Box 19.
- Click Save and repeat for the other boxes.
The Create W-2 Data page, accessed by clicking the  icon on the W-2 processing page, allows authorized users to create the data to be used on employees’ W-2 forms.
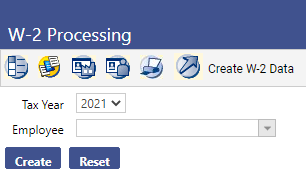
- Select the Tax Year. The current year is the default value.
- Leave the Employee field blank to create W-2 data for all employees. If you want to create W-2 data for a specific employee, select that Employee.
-
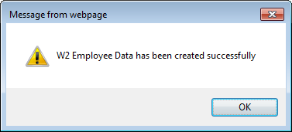
Click Create. You should see a message like the following:
- You can now work with the W-2 data you have created.
The W-2 Company List page, accessed by clicking the  icon on the W-2 Processing page, allows authorized users to work with companies available for W-2 processing.
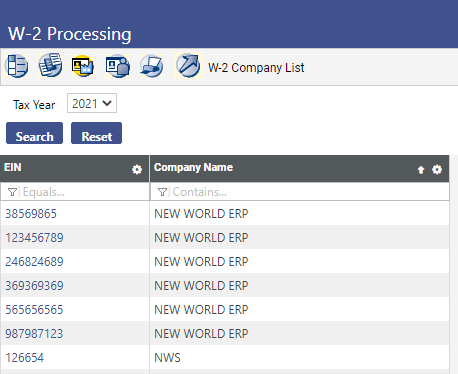
Note: Company information for all companies with W-2 data will be created during the Create W-2 Data process. Existing company data will not be overwritten.
-
If you need to edit the company information before W-2s are created, click the EIN hyperlink. If you need to add a new company for this tax year, click the New button. The W-2 Company pop-up will open:
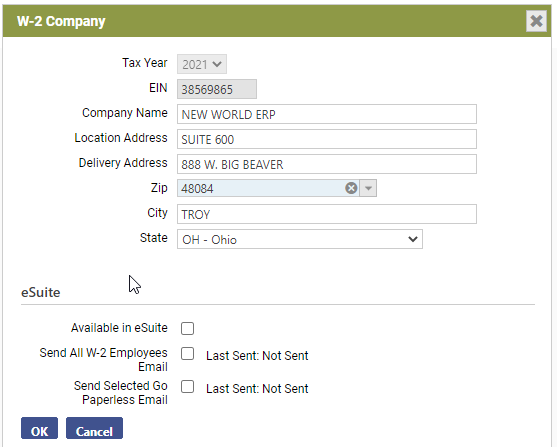
- Select the Tax Year. The current year is the default value.
- Enter the EIN, or tax ID, for the company. This field is required. It may contain 9 digits. This value may not be edited once the record is saved.
- Enter the Company Name. This is how the company will be named on W-2s and reports. This field is required. It may contain 100 characters.
- A Location Address can be entered, if it is different from the Delivery Address. This field may contain 50 characters.
- Enter the company’s Delivery Address. This field is required. It may contain 50 characters.
-
Type the beginning of the Zip Code value. The field will filter the options based on the values entered so the correct Zip can be selected without needing to type the entire code. Once the Zip is entered, the system will populate the City and State fields with the corresponding values.
Either a Zip or a Zip+4 value may be entered. If you use the Zip+4 format, the hyphen must be included between the fifth and sixth digits for the value to populate the City and State fields.
- If the City needed is different than the one the system selected, enter the value. The City may contain up to 50 characters.
-
If you require a different State value, select the correct state.
Note: Steps 10, 11 and 12 below apply only if you are licensed to eSuite.
- Select the Available in eSuite box if you want W-2s to be available for viewing in eEmployee.
- Select the Send All W-2 Employees Email check box if you want all employees to receive emails informing them of the option in eSuite to have their W-2s delivered electronically.
-
Select Send Selected Go Paperless Email check box if you want all employees who choose the electronic delivery of W-2s to receive emails informing them that their W-2s are available in eSuite.
The email templates for these processes are located on the Email Template Setup page in Maintenance (Maintenance > new world ERP Suite > System > Email Templates).
- Click OK to save the company record.
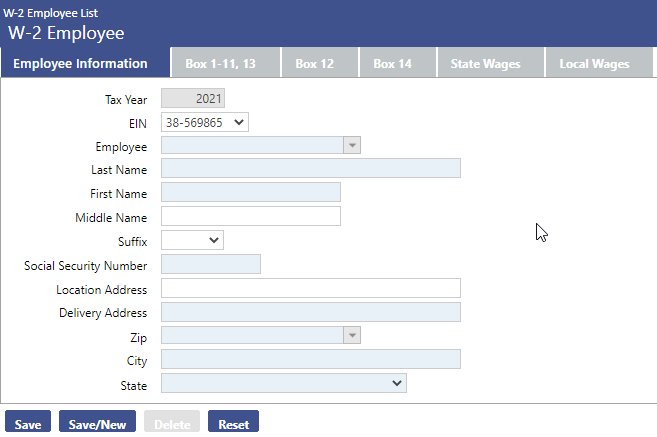
The ![]() W-2 Employee List page, accessed by clicking the
W-2 Employee List page, accessed by clicking the  icon on the W-2 Processing page, lets you work with employees who should receive W-2s.
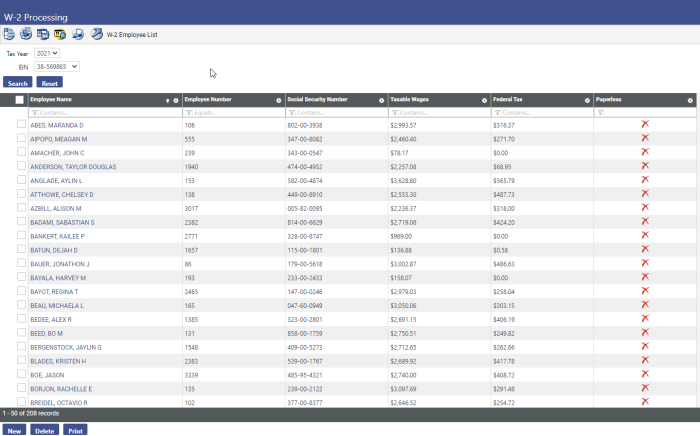
Use the search Tax Year and EIN fields to filter the results that display. To filter the grid by a specific column, type an entry in the cell immediately below the column header.
-
To edit an employee's information, click the Employee Name. To add an employee who is not on the list but who should receive a W-2, click the New button. In either instance, the W-2 Employee page opens with the
 Employee Information tab selected as the default.Field Descriptions
Field Description Tax Year The Tax Year is disabled. It is populated based on the year selected on the W-2 Employee List page EIN Select the EIN, or tax ID, for the company. All EINs set up on the W-2 Company page for the selected tax year are available for selection. Employee If the person to be added is an employee, select him or her from the Employee field or use the  icon to search for the name. The selection populates the fields below with the values from the employee record.
Name Employee's name. Suffix Employee's name suffix, if applicable. Social Security Number Required. Location Address If applicable, this entry appears as the second address line on the employee’s W-2. Delivery Address Required. Zip Once the Zip is entered, the system populated the City and State fields with the corresponding values.
A zip or a zip+4 value may be entered. If you use the ip+4 format, include the hyphen between the fifth and sixth digits for the value to populate the City and State fields.
-
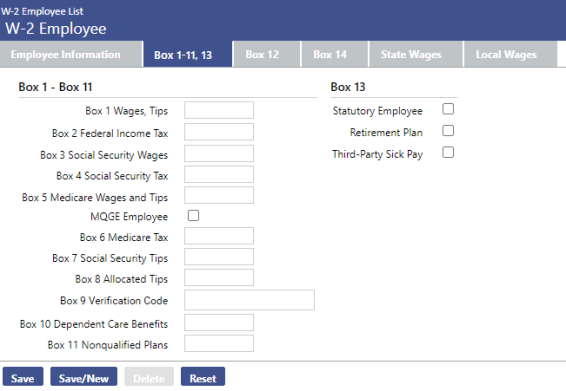
Once the employee information is entered, select the
Box 1-11, 13 tab to enter information that should appear on the W-2 form:Field Descriptions
Field Description Box 1 Wages, Tips Federal taxable wage (before payroll deductions) paid to the employee during the year. Box 2 Federal Income Tax Federal income tax withheld from the employee’s wages for the year. Box 3 Social Security Wages Total wages paid (before payroll deductions) subject to employee Social Security tax but not including Social Security tips and allocated tips. The sum of Box 3 Social Security Wages and Box 7 Social Security Tips for 2021 cannot exceed $142,800.00 Box 4 Social Security Tax Employee Social Security tax withheld, including Social Security tax on tips. The employee tax rate for social security is 6.2%. The employer tax rate for social security is 6.2%. Box 5 Medicare Wages and Tips Total of wages and tips subject to Medicare tax. This value must be greater than or equal to the sum of Box 3 Social Security wages and Box 7 Social Security tips. MGQE Employee Signifies whether the employee is exempt from paying Social Security (FICA). The box is checked automatically if the employee has zero Social Security Wages. The system issues a warning if this check box is selected and Box 3 Social Security Wages is greater than zero. Box 6 Medicare Tax Total employee Medicare tax withheld. It includes only tax withheld for wages and tips. Box 7 Social Security Tips Total tips the employee reported. The sum of Box 3 Social Security Wages and Box 7 Social Security Tips for 2021 cannot exceed $142,800.00. Box 8 Allocated Tips Total of tips allocated to the employee for this year. Box 9 Verification Code Verifies the authenticity of the W-2 data taxpayers submit on e-filed returns. This field replaces the Box 9 Advance EIC Payments field. As part of a pilot program implemented to combat tax-related identity theft and refund fraud, the IRS has partnered with certain vendors to include this verification code on many employee W-2 forms; New World ERP, however, is not a selected vendor and does not fill in this field.
The verification code does not appear on the W-2 Register, but if the field is filled in, it appears on the W-2 form.
Box 10 Dependent Care Benefits Total dependent care benefits under a dependent care assistance program (section 129) paid to the employee or incurred by the employer for the employee. Box 11 Unqualified Plans Distributions to an employee for a non-qualified plan or a non-governmental section 457 plan. Statutory Employee The Statutory Employee check box signifies whether statutory employees’ earnings are subject to Social Security and Medicare taxes but are not subject to Federal income tax withholding. It is cleared by default Retirement Plan The Retirement Plan check box signifies whether the employee was an active participant in a retirement plan (e.g., pension, profit-sharing, stock-bonus plan, annuity plan, simplified employee pension, trust, etc.). It is cleared by default. Third-Party Sick Pay The Third-Party Sick Pay check box signifies that the employer is a third-party sick pay payer filing a Form W-2 for an insured’s employee or is an employer reporting sick payments made by a third party. It is cleared by defaul -
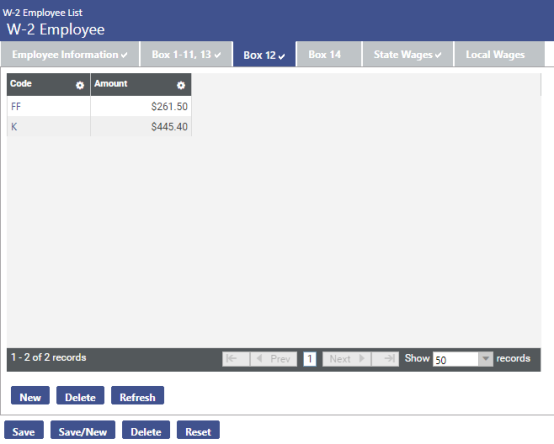
Once the employee information is entered, select the
Box 12 tab to enter more information that should appear on the W-2 form: -
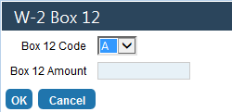
To add Box 12 information, click the New button. The
W-2 Box 12 pop-up opens:Field Descriptions
Field Description Box 12 Code Select the Box 12 Code that should be used for this employee. The options are predefined. Refer to your W-2 instructions or contact your accountant for additional information. Box 12 Amount Enter the Box 12 Amount that applies for this employee. The acceptable range is $0.01 through $999,999,999.99. Zero (0.00) is an invalid entry. - Click OK to save Box 12 entries.
-
Once the Box 12 information is entered, select the
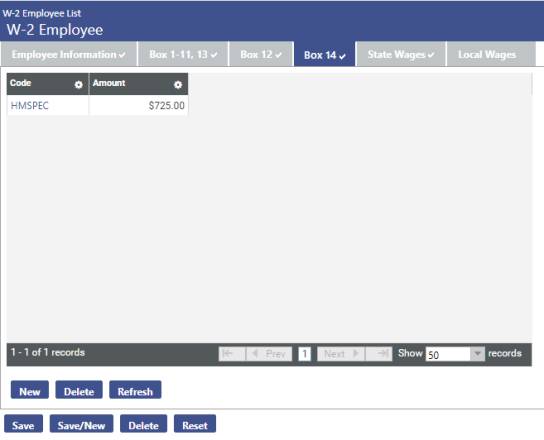
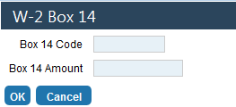
Box 14 tab to enter more information that should appear on the W-2 form: -
To add Box 14 information, click the New button. The
W-2 Box 14 pop-up opens:Field Descriptions
Field Description Box 14 Code Enter the Box 14 Code that should be used for this employee. The Box Code for Box 14 is a validation set and may be set up to contain the values needed by the organization. Box 14 Amount Enter the Box 14 Amount that applies for this employee. The acceptable range is $0.01 through $999,999,999.99. Zero (0.00) is an invalid entry. - Click OK to save Box 14 entries.
-
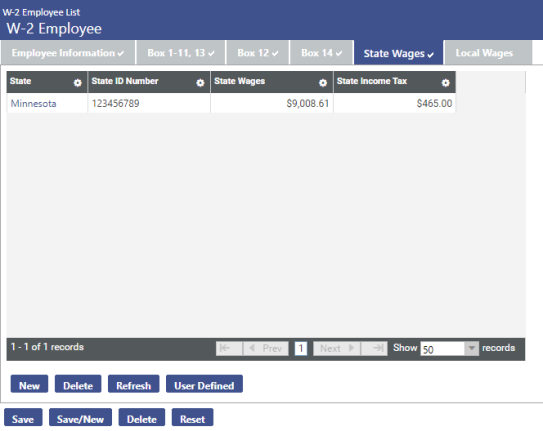
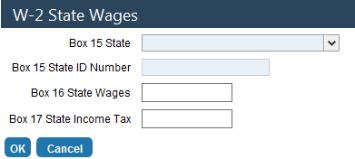
Once the Box 14 information is entered, select the
State Wages tab to enter more information that should appear on the W-2 form: -
To add State Wages information, click the New button. The
W-2 State Wages pop-up opens:Field Descriptions
Field Description Box 15 State State that should be used for this employee. All states are included in the list. This field is required. Box 15 State ID Number Required. Box 16 State Wages Total dollar amount of state wages earned by the employee. This field is required. The acceptable range is $0.01. through $999,999,999.99. Zero (0.00) is not a valid entry. Box 17 State Income Tax Total dollar amount of state income tax paid by the employee. The acceptable range is $0.01. through $999,999,999.99. It may be left blank, which will display as $0.00 on the list page. - Click OK to save state wage entries.
-
Once the State Wages information is entered, select the
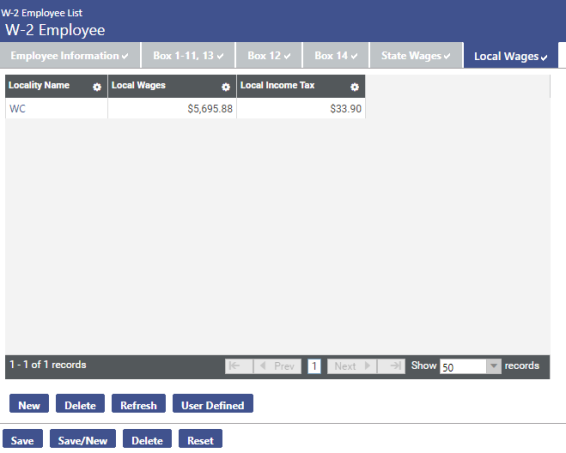
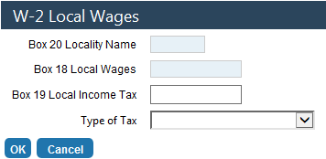
Local Wages tab to enter more information that should appear on the W-2 form: -
To add Local Wages information, click the New button. The
W-2 Local Wages pop-up opens:Field Descriptions
Field Description Box 20 Locality Name Name of the locality reporting local income tax information. This entry is required. Customers who have Other taxes should verify the code in the Locality field. Box 18 Local Wages Total dollar amount of local wages earned by the employee. This entry is required. Box 19 Local Income Tax Total dollar amount of local income tax paid by the employee. The acceptable range is $0.01. through $999,999,999.99. It may be left blank, which will display as $0.00 on the list page. Type of Tax Select the Type of Tax: C-City, D-County, E-School District, F-Other Income Tax - Click OK to save local wage entries.
- Click Save to save all changes made to the employee record on these tabs.
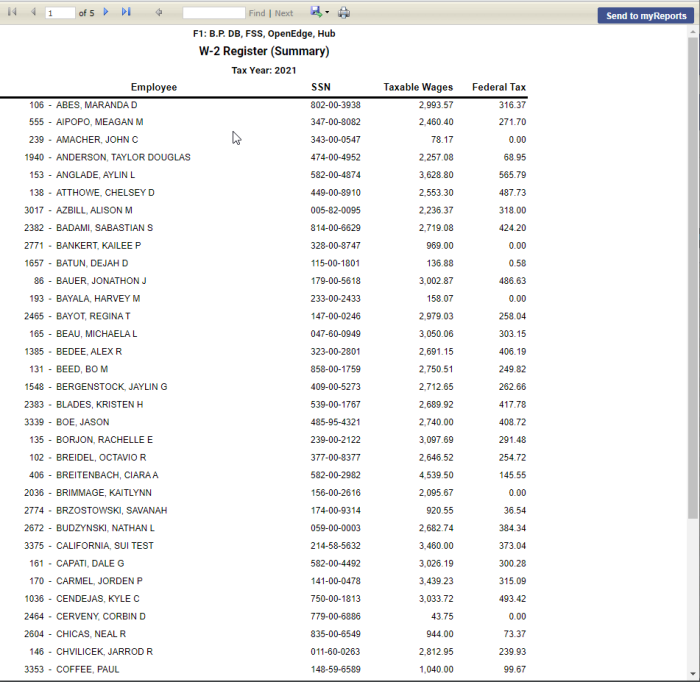
The W-2 Register pop-up, accessed by clicking the Print button on the W-2 Employee List page, allows authorized users to print the W-2 register.
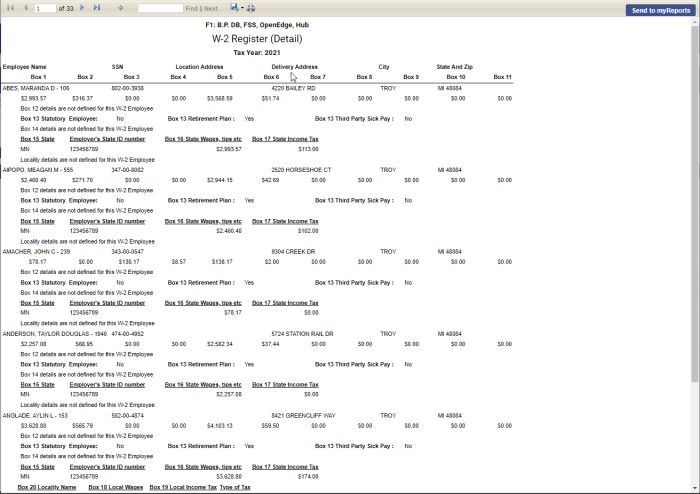
The summary register lists taxable wages and federal taxes for each employee. The detail register lists all W-2 information for each employee. It also includes totals that may be compared to the 941s for the year. This will verify that the grand total taxes and wages reported on the W-2s match the amounts paid during the year.
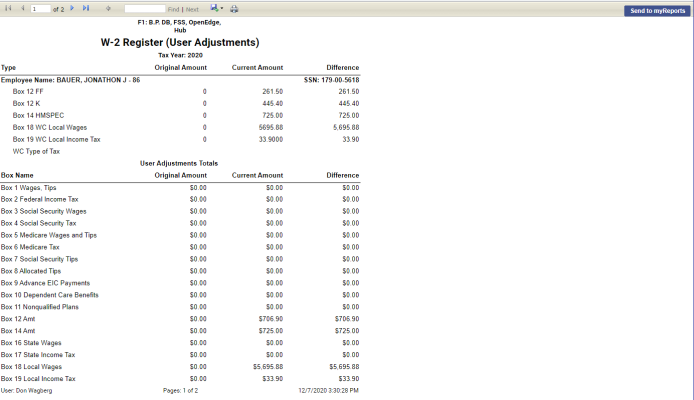
The W-2 Register also may be used in conjunction with the Payroll History Report and the Earnings History Report to reconcile individual employee amounts. The User Adjustments mode is helpful for reviewing any discrepancies between the actual earnings history (including checks, voids and adjustments) and the current W-2 figures. These would be changes made from the W-2 employee list.
The W-2 Register may be sorted by employee name or department.
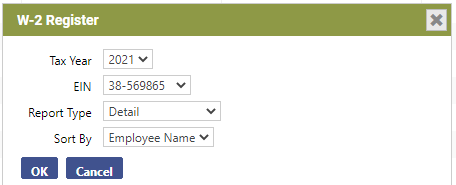
- Select the Tax Year. The current year is the default value.
- Select the EIN for which you want to produce the register. This value defaults from the W-2 Employee List page.
- Select the Report Type that you would like to run. The options are Detail, Summary and User Adjustments. Detail is the default value.
- Select the Sort By type for the register. The options are Employee Name and Department. Employee Name is the default selection.
- Click OK to run the register.
Report Type = Detail
The Detail option for this report allows users to see the contents of all the boxes on the W-2.
Report Type = Summary
The Summary option for this report allows users to see the Box 1 and Box 2 information for employees receiving a W-2.
Report Type = User Adjustments
The User Adjustments option for this report allows users to see the adjustments that were made to an employee’s W-2 file since the W-2 data was created.
Note: Special instructions for printing the W-2 Z-fold form appear at the end of this section.
The Print W-2 Form page, accessed by clicking the  icon on the W-2 Processing page, allows authorized users to print official W-2s.
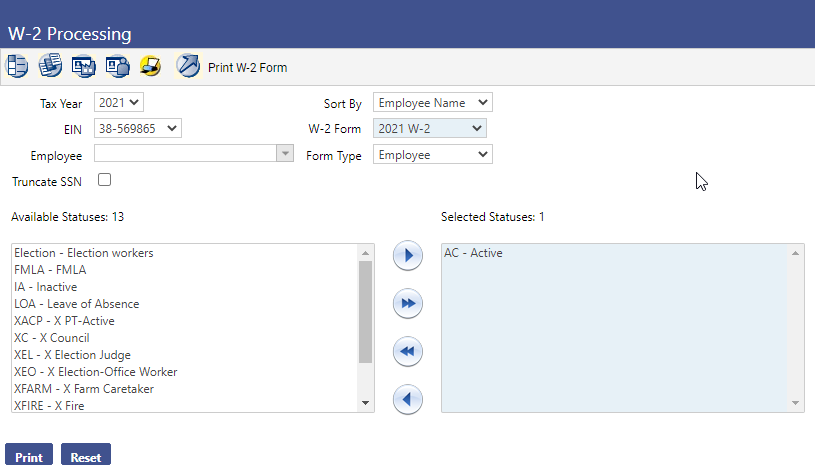
- Select the Tax Year. The current year is the default value.
- Select the EIN. This value defaults from the W-2 Employee List page.
- Leave the Employee field blank to print W-2s for all employees. Select the Employee if W-2s should be printed for only one employee.
- Mark Truncate SSN to mask the social security number on the W-2, showing only the last four digits.
- Select the Sort By. The options are Employee Name and Department.
- Select the W-2 Form that you plan to use. This field is required.
- Select the Form Type. The default is Employee. The options are Employee and Employer.
- Select the Available Statuses for which W-2 forms will be created. Forms will be created for employees who have the selected status(es) as of the date the print job is submitted.
-
Click Print to send the print file to myReports.
Note: A W-2 will not print for any employee who has elected to go paperless and has a primary email address set up in Workforce Administration; however, if an employee is selected in the Employee prompt (step 3 above), a W-2 will print. The Employer W-2 will print all employees.
-
From myReports, click the Print W-2 Form - Employee or Print W-2 Form - Employer link on the left side of the page. The form will display on the right side of the page. This allows the user to view the forms before printing:
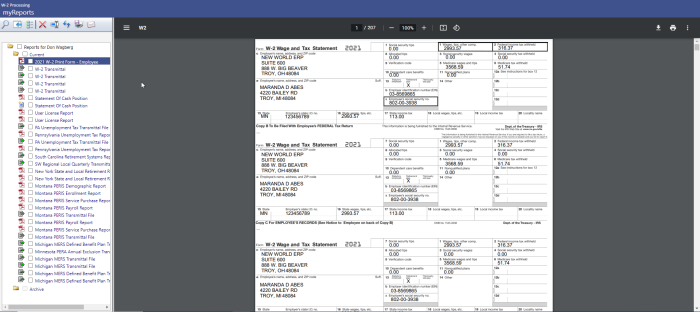
-
Click
 in the Adobe toolbar of the preview pane:
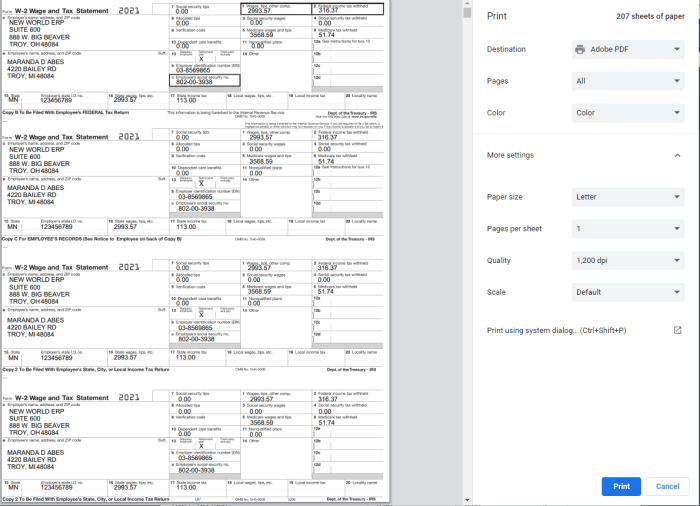
-
Select the appropriate print options.
Note: It is recommended that you first print one form to ensure the paper is loaded correctly in your printer before you print all forms.
- Click Print.
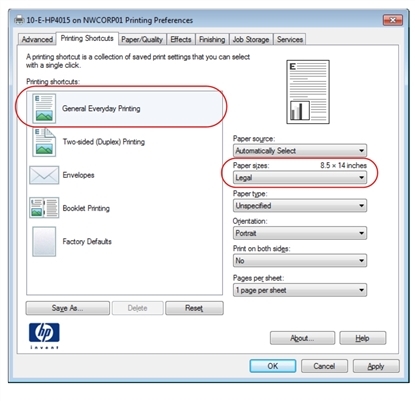
Print W-2 Z-Fold Form
Note: The W-2 Z-fold form must be printed on a network printer, due to additional printer setup that needs to be performed.
The Z-fold version of the W-2 form prints on legal-size paper. Printing from new world ERP uses the default paper size for the printer you select, so unless that is the default for your printer, you will need to follow the steps below to change the network printer’s default paper size to Legal.
-
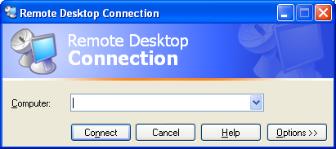
Connect to the server that houses the application server or the report server (if installed) by going to Start > Run and typing mstsc /console:

- In the Computer field, type the name of your server and click Connect.
- Log into the server using the administrator log in.
- Select Start > Devices and Printers or Start > Printers and Faxes.
- Right click the printer you will use to print the Z-fold W-2 forms. Remember that it should be a network printer, not a local printer.
-
Select Printing Preferences from the menu. Set the default paper size to Legal. Below is an example for an HP PCL5 printer:
-
Click Apply to make the changes.
Note: The log-on user for the service must have rights to the printer that you will use to print the Z-fold forms. This setup has been performed if the printer is available for selection on the myReports page.
- You may print the W-2 Z-fold forms from the Print W-2 Form page in new world ERP. Remember to select the 2021 W-2 Z-Fold or 2021 W-2 Z-Fold Blank option in the W-2 Form field. When you select the Print button at the bottom of the preview pane in myReports, the printer will expect legal-size paper to be used.
- Once the forms are printed, return your network printer to its default settings.
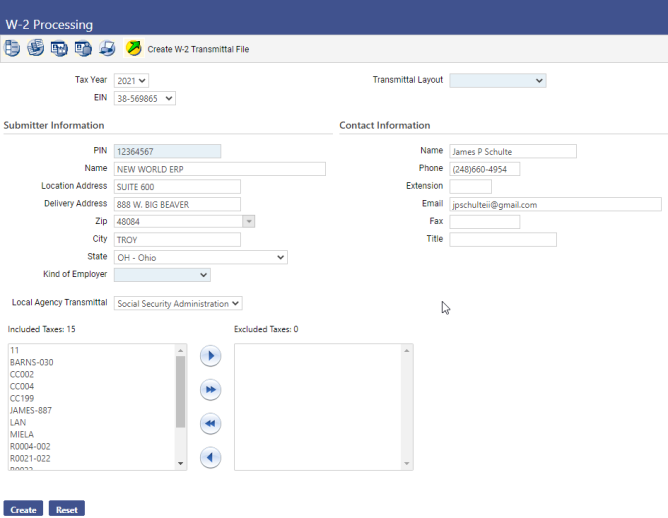
The Create W-2 Transmittal File page, accessed by clicking the ![]() icon on the W-2 Processing page, allows authorized users to create an electronic W-2 file for submission to the federal government.
icon on the W-2 Processing page, allows authorized users to create an electronic W-2 file for submission to the federal government.
![]()
- Select the Tax Year. The current year is the default value.
- Select the EIN. This value defaults from the W-2 Employee List page.
- Enter the PIN. This is the number assigned by the IRS to uniquely identify the submitter. This field is required. It may contain 8 characters.
- Enter the submitter’s Name. This value may contain up to 57 characters. The value is defaulted from the W-2 Company record.
- Enter the Location Address, if different from the delivery address. This value may contain up to 22 characters.
- Enter the Delivery Address. This is the address used for all mail and shipments. This value may contain up to 22 characters. The value is defaulted from the W-2 Company record.
-
The Zip Code value is defaulted from the W-2 Company record. If you need to change the value, type the beginning of the new value. The field will filter the options based on the values entered so the correct Zip can be selected without needing to type the entire code. Once the Zip is entered, the system will populate the City and State fields with the corresponding values.
Either a Zip or a Zip+4 value may be entered. If you use the Zip+4 format, the hyphen must be included between the fifth and sixth digits for the value to populate the City and State fields.
- If the City needed is different than the one matching the Zip Code value, enter the value. The City may contain up to 22 characters.
- If you require a different State value, select the correct state.
- Select the Kind of Employer. The corresponding letter code from your selection will appear in position 174 of the transmittal file
-
The state of Ohio needs to create a local W-2 transmittal file. Selecting Ohio as the State displays a Local Agency Transmittal drop-down field and multi-select list boxes containing local taxes. Available selections in the drop-down are Social Security Administration, State of Ohio, Regional Income Tax and Central Collection Agency:
-
Use the multi-select list boxes to exclude specific local taxes from the W-2 transmittal file. The available selections in the boxes are the Locality entries from the "Other" tax codes that were set up in Maintenance and were used in the Create W-2 Data step. To exclude a tax, move it from the Included Taxes box on the left to the Excluded Taxes box on the right.
If Michigan is selected as the State and Flint Local as the Local Agency Transmittal, the transmittal file appropriately will contain the FL or Flint code, depending on how it is named in the Locality field on the Other Tax page in Maintenance (Maintenance > Human Resources > Deductions and Benefits > Taxes).
If W-2s are processed before the Locality code for Flint has been set up, the code may be added manually through the W-2 Employee Local Wages tab in W-2 Processing (Human Resources > Year-End Processing > W-2 Processing > W-2 Employee List > Employee Name > Local Wages > New).
If Michigan is selected as the State and Lansing or East Lansing as the Local Agency Transmittal, the transmittal file will contain the LAN or MIELA code, depending on how it is named in the Locality field on the Other Tax page in Maintenance.
If State of Ohio is selected as the Local Agency Transmittal, only Ohio RS39 records are included in the transmittal file. Any employee who is not associated with an RS39 record is excluded.
To complete an Ohio CCA transmittal file, the State Control Number and Municipality Name must have entries on the Other Tax page in Maintenance > Human Resources > Deductions and Benefits > Taxes > Other Tax Code. State Control Number displays in positions 331-337 of the CCA transmittal file and the Municipality Name in positions 338-412. These entries are required for each municipality. They are not effective-dated so many be changed at any time.
- Select the Transmittal Layout format that you want to use for this file. This field is required.
- Enter the contact person’s Name. This is the name of the person at the organization that the IRS should contact if there are concerns about the transmittal file. The name is required; it may contain up to 27 characters.
- Enter the Phone. This is the phone number of the person at the organization that the IRS should use if there are concerns about the transmittal file. Either the phone number or email address is required; it must contain 10 digits if it is used.
- Enter the phone Extension, if applicable. This field may contain up to 5 characters.
- Enter the Email address. The contact’s email address may contain up to 40 characters. Either the email address or the phone number is required.
- Enter the Fax number. This field must contain 10 digits if it is used.
- Enter the Title of the contact person’s role, if desired.
- Click the Create button. The transmittal file will be sent to myReports.
-
Go to myReports. Click the 2021 W-2 Transmittal link on the left side of the page. The File Download pop-up will open:
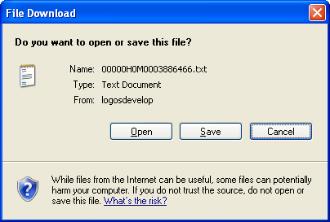
- Click the Save button and save the file to a folder on your computer where it can be located to send to the IRS.
Prior to your sending the W-2 transmittal file, it is recommended that you run the file through AccuWage.
AccuWage is free software from the Social Security Administration that allows you to check the W-2 transmittal file for correctness.
AccuWage is available at the Social Security Administration website: www.ssa.gov/employer/accuwage
To accommodate situations when employees have local taxes from different states, a State field is available on the Other Tax page in Maintenance:
Select the appropriate state from the drop-down.
When the Locality Code on the Other Tax page matches the Box 20 Locality Name on the W-2 Employee Local Wages tab in W-2 Processing, and the state of the local code and the state gross are Maryland, all local taxes will be added to the state tax in the W-2 transmittal file, placing the total amount in RS record position 287-298.
Selecting Ohio as the State on the Create W-2 Transmittal File page (Human Resources > Year-End Processing > Create W-2 Transmittal) displays a Local Agency Transmittal drop-down field and multi-select list boxes containing local taxes.
Available selections in the drop-down are Social Security Administration, State of Ohio, Regional Income Tax and Central Collection Agency.
Use the multi-select list boxes to exclude specific local taxes from the W-2 transmittal file. The available selections in the boxes are the Locality entries from the "Other" tax codes that were set up in Maintenance and were used in the Create W-2 Data step. To exclude a tax, move it from the Included Taxes box on the left to the Excluded Taxes box on the right.
If State of Ohio is selected as the Local Agency Transmittal, only Ohio RS39 records are included in the transmittal file. Any employee who is not associated with an RS39 record is excluded.
To complete an Ohio CCA transmittal file, the State Control Number and Municipality Name must have entries on the Other Tax page in Maintenance > Human Resources > Deductions and Benefits > Taxes > Other Tax Code. State Control Number displays in positions 331-337 of the CCA transmittal file and the Municipality Name in positions 338-412. These entries are required for each municipality. They are not effective-dated so many be changed at any time.
Central Collection Agency Requirements
Maintenance > Human Resources > Deductions and Benefits > Taxes > Other Tax Code
Human Resources > Year-End Processing > W-2 Processing > Create W-2 Transmittal
For the Ohio Central Collection Agency (CCA), the Locality code from tax maintenance needs to be populated on the RS record for all cities, not only CCA members.
When the transmittal file for Ohio CCA is processed, the Locality code from tax maintenance determines the code populated on the transmittal file; for example, a Locality code of CC123 on the tax setup populates a CC in field 5-6 and 123 in field 7-9 on the RS records.
Since CC123 is a member of CCA, the CC characters define the location on the transmittal file; other cities, however, are not members of CCA. They also have locality codes that need to be reported, but because they are not members, they do not need to report a CC in field 5-6; this field must be blank.
In the case of a Locality code of R0345 (Canton OH RITA tax), this non-CCA member tax has been reported in field 3-9 of the transmittal file as 887, where 887 is unknown. The CCA has given Canton OH a city code of 445, meaning the Locality code for Canton tax is set up as R0345 for Rita tax, but now needs to be reported to CCA with a Locality code of 445.
In tax maintenance, a CCA non-member Locality code needs to be populated for all local taxes that can be used for reporting on the W-2 transmittal.
The Locality code will allow 9 characters. To populate correctly, a format of R0123-234 is needed, where R0123 is used for RITA, and 234 is used for the CCA non-member city.
| Rules and Setup | ||
|---|---|---|
| A Rita tax will never be a CCA member, but it can be a Rita and a non-member CCA city. | ||
| Ex. | Locality for Rita | R0123 |
| Ex. | Locality for CCA member | CC123 |
| Example 1 | ||
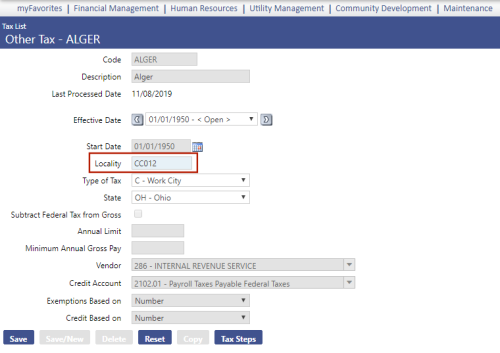
| ALGER | 004 | Non-Rita, CCA member |
| Locality code | CC012 | No changes (view |
| Example 2 | ||
| AVON | 020 | Rita |
| Avon | 020 | CCA non-member city |
| Locality code | R0020-020 | Where R0020 is used for Rita, and -020 is used for CCA non-member city (view |
| Example 3 | ||
| AVON LAKE | 021 | Rita |
| Avon Lake | 022 | CCA non-member city |
| Locality code | R0021-022 | Where R0021 is used for Rita, and -022 is used for CCA non-member city (view |
| Example 4.1 and 4.2 | ||
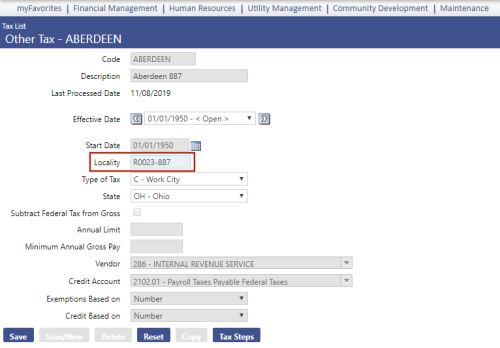
| Aberdeen | 023 | Rita Only, no CCA city code or unknown |
| Aberdeen 887 | R0023-887 | R0023 is used for Rita, and -887 is used for CCA (view |
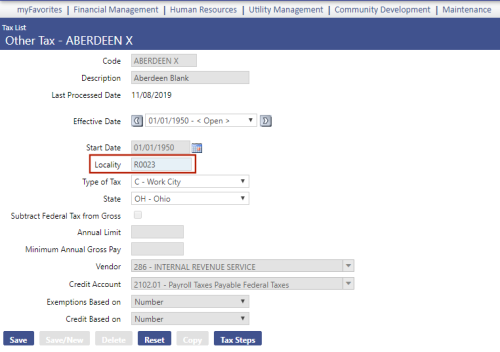
| Aberdeen X | R0023 | R0023 is used for Rita, and a blank or null value will default to 887 for CCA (view |
| Example 5 | ||
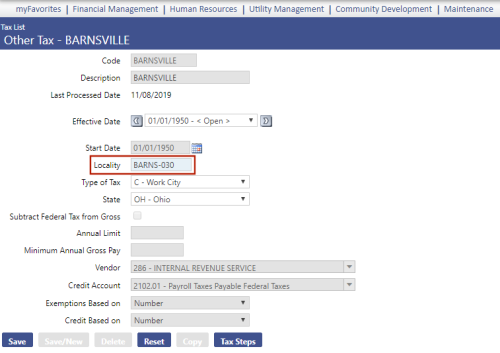
| BARNESVILLE | 030 | Non Rita, CCA non-member city code |
| Locality code | BARNS-030 or XXXXX-030 | XXXXX is used for Rita (cannot begin with RO or CC), and -030 is used for CCA (view |
| Example 6 | ||
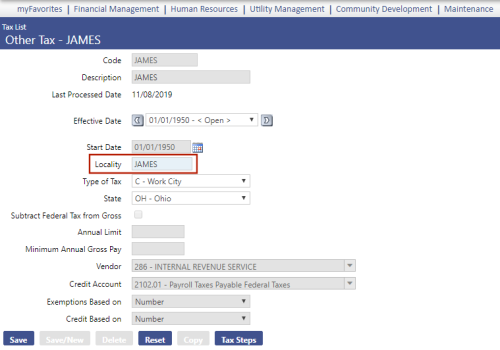
| JAMES | NA | Non Rita, Non CCA, no codes for either |
| Locality code | JAMES or XXXXX | XXXXX can be anything (as long as it does not begin with RO or CC), Rita is okay, and CCA will default to 887 (view |


Ohio Local Tax Setup
When a local tax for SSA is set up for a city, the Locality entry should start with a C, followed by four numbers. When it is set up for a school district, the entry should start with an E, followed by four numbers. (Type of Tax is not used.)
When the tax is to go to the Regional Income Tax Agency, the Locality is expected to start with RO, followed by three numbers (RO###). When the tax is to go to the Central Collection Agency, the Locality is expected to start with CC, followed by three numbers (CC###). Both taxes require a Type of Tax selection. The Type of Tax should be R for Residential or C for City.
The employee's state wage needs to be OH.
When the SSA transmittal file is run, the standard Ohio transmittal file will run. All employees will be included, but only the selected local tax codes data will be supplied.
When the Regional Income Tax Agency or Central Collection Agency is selected, only the employees who have the selected local taxes will be included.
Following is a list of the tasks to be performed in 1095-C processing. Following this list will help to ensure a smooth year-end process:
|
1095-C Processing |
|
|
Daily Processing |
|
|
r |
Identify full-time employees through the Initial Measurement Period Report and the Standard Measurement Period Report. |
|
r |
In the Offer and Coverage section on the Employer Reporting tab of Workforce Administration, record information needed for the 1094-C and 1095-C forms. |
|
r |
Using Benefits Administration or the Covered Individual section on the Employer Reporting tab of Workforce Administration, set up covered individuals to be reported on the 1095-C forms. |
|
1095-C Processing |
|
|
r |
Order 1095-C forms. |
|
r |
For customers on the 2021 release, make sure to apply the year-end processing patch 2021.1.18.1. |
|
r |
Verify that the correct Plan Start Month is set up. |
|
r |
Generate the 1095-C work file using Create 1095-C Data. |
|
r |
Review and update the information for the Applicable Large Employer Member List. |
|
r |
Review 1095-C Employee for any employee who may have incorrect 1095-C data. |
|
r |
Print and review the 1095-C Register. |
|
r |
Print 1095-C Forms. |
|
r |
Create 1095-C Transmittal for submission to the IRS. |
|
r |
Distribute 1095-Cs to employees. |
|
r |
Submit the 1095-C information to the IRS. |
Users will need permission to the appropriate 1095-C Processing components in new world ERP Suite Security:
- Navigate to Maintenance > new world ERP Suite > Security > Users.
- Select the user.
- Click Permissions.
- Type 1095 in the Search Security Components filter.
-
Click Search. The components for 1095-C Processing will display:
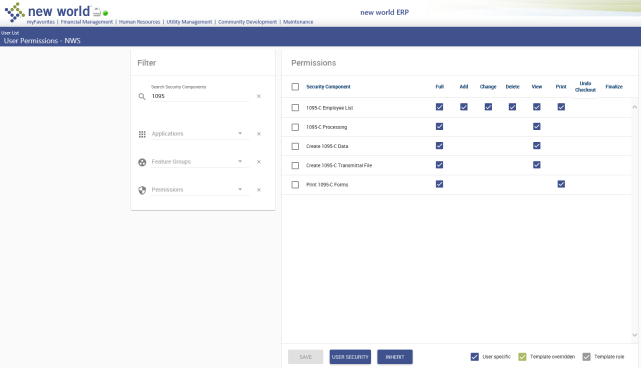
- Select the appropriate permissions.
- Click Save.
- For the permissions to take effect, the user will need to log off, then log back onto the system.
Maintenance > Human Resources > Company HR Settings > Employee
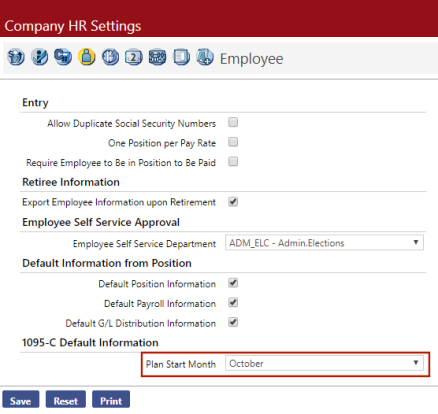
Use the Plan Start Month field to designate a plan start month for 1095-C processing. This entry will print on 1095-C forms and the transmittal to the IRS.
If you want any benefit groups to have a different plan start month from the one selected in Company HR Settings, use the Override Plan Start Month field on the Benefit Group page.
Maintenance > Human Resources > Employee Attributes > Benefit Groups > Code
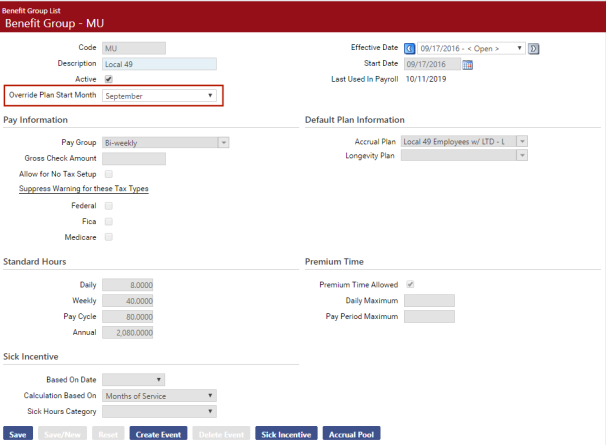
The 1095-C create process will determine all the primary job benefit groups for each employee during the tax year and select the earliest Override Plan Start Month from these benefit groups. If the Override Plan Start Month is blank in every case, it will use the Plan Start Month from Company HR Settings.
For non-employees, the create process will check the start month on the Non-Employee Benefit Plan Entry page in Maintenance for all the non-employees’ plans where 6055 Reporting is selected. The create process will use the earliest month found.
Human Resources > Year-End Processing > 1095-C Processing
1095-C Processing uses a work-flow format to organize the steps and allow users to logically step through them.
Use the Create 1095-C Data page, accessed by clicking the  icon on the 1095-C Processing page, to aggregate the employee and company data needed to generate and print your 1095-C forms and send the associated transmittal file to the IRS:
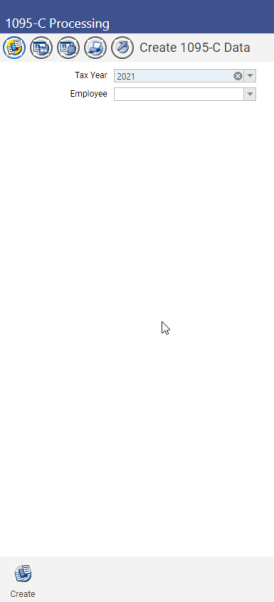
- Select the Tax Year being processed. The drop-down contains all available years through the current year. During the months of January through September, the previous year is defaulted. During October through December, the current year is defaulted.
- Select the Employee whose 1095-C data is to be updated for the Tax Year selected. Leave the field blank to update data for all employees. The drop-down contains an alphabetized list of all employees.
- Click the Create button to create the 1095-C file. A message may display, telling you 1095-C data already exists and asking whether you want to overwrite it. Clicking OK will clear data for the selected year before generating the new data. Clicking Cancel will abandon the process.
Use the Applicable Large Employer (ALE) Member List page, accessed by clicking the  icon on the 1095-C Processing page, to review and maintain the employer information for your 1095-C forms and transmittal file. This data is sent to the IRS along with the employee 1095-C forms and the employer 1094-C form:
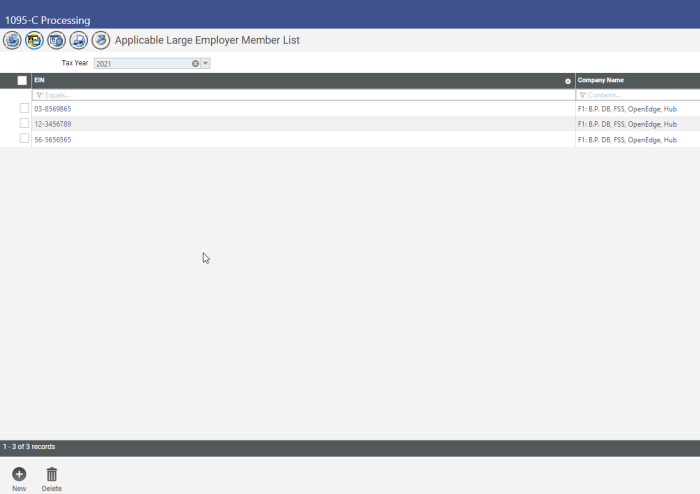
Note: Although the system generates some of the employer data, such as name, address, authoritative transmittal and full-time and total employee counts, you will need to enter the rest of the data, such as the certification of eligibility, MEC offer indicator and section 4980H transition relief indicator.
-
Select the Tax Year. The drop-down contains all available years through the current year. The default selection is the highest year for which data exists. When you select a year, the grid below is refreshed with the data for that year.
The grid contains the following data:
EIN: Nine-digit employer identification number assigned by the IRS.
Company Name: Name of the company identified by the EIN.
-
To add an ALE member, click the New button below the grid; to edit an existing ALE member, click the associated EIN link in the grid. In either instance, the Applicable Large Employer Member page will open:
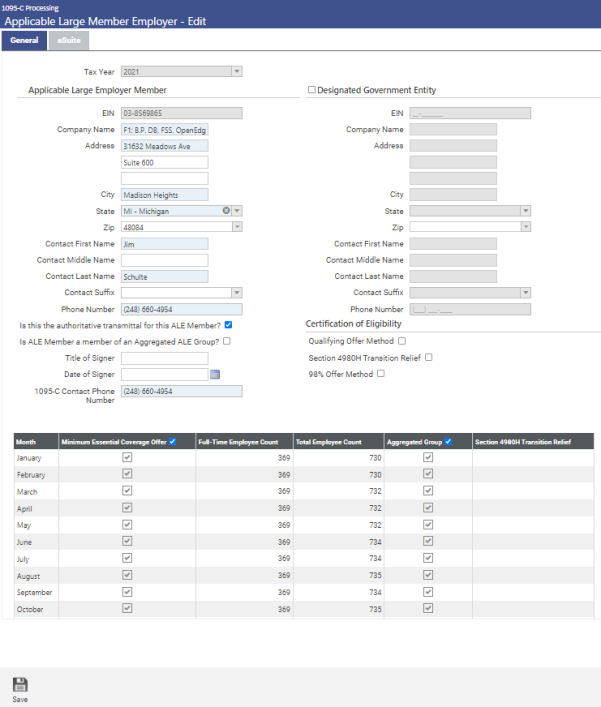
The data on the General tab of this page consists of three parts found on form 1094-C:
- Name and address of the ALE and the Designated Government Entity
- Miscellaneous information about the associated employee forms
- A grid of the monthly information
-
Select the Tax Year being processed. The drop-down contains all available years through the current year. During the months of January through September, the previous year is defaulted. During October through December, the current year is defaulted. If you are editing employer information, this field is disabled.
Applicable Large Employer Member
- Enter the nine-digit, state-assigned employer identification number (EIN). EIN is determined by an entry in the Company field on the Employment tab of Workforce Administration. The Value of the validation set entry contains the EIN. If you are editing employer information, this field is disabled.
- Enter the Company Name.
- Enter the Address, City, State and Zip of the company. The first Address field requires an entry. Use the second and third fields for suite number, apartment number or other parts of the address.
- Enter the name of the contact person for your organization.
- In the Phone Number field, enter the number for the IRS to contact if it has questions.
- If the transmittal file is the authoritative file for the ALE member, select the Is this the authoritative transmittal for this ALE member? check box.
- If the ALE member is a member of an aggregated ALE group, select the Is ALE Member a member of an Aggregated ALE Group? check box. This box is enabled only if the check box above it is selected.
- In the Title of Signer field, enter the position title of the person signing the form.
- In the Date of Signer field, select the date the form was signed.
-
In the 1095-C Contact Phone Number field, enter the contact phone number to be printed on the 1095-C forms that are distributed to employees.
Designated Government Entity
- Select the Designated Government Entity check box to enable the fields below it.
- Enter the nine-digit, state-assigned EIN.
- Enter the Company Name.
- Enter the Address, City, State and Zip of the company. The first Address field requires an entry. Use the second and third fields for suite number, apartment number or other parts of the address.
- Enter a Contact Name.
-
Enter the contact person’s Phone Number.
Certification of Eligibility
-
In this section, select any of the following check boxes that apply. These boxes are enabled only if this transmittal is the authoritative one for this ALE member (Is this the authoritative transmittal for this ALE member? is selected).
- Qualifying Offer Method
- Section 498OH Transition Relief
-
98% Offer Method
Grid
The Month column contains all 12 months.
-
Select the applicable months for the Minimum Essential Coverage Offer. To select all entries in the column, select the check box in the column header.
The Full-Time Employee Count column contains the count of employees with Full-Time Employee selected on the Offer and Coverage Detail section of Workforce Administration effective as of the first day of the corresponding month for the current tax year.
The Total Employee Count column contains the count of employees who qualify to be in a pay batch as of the first day of the corresponding month for the current tax year.
- Select the applicable months for the Aggregate Group. To select all entries in the column, select the check box in the column header.
-
Enter the appropriate value in the Section 4980H Transition Relief cell for each month. If the employer certifies by selecting box C on line 22, that it is eligible for Section 4980H Transition Relief and is eligible for the 50 to 99 Relief, enter code A. If the employer certifies by selecting box C on line 22, that it is eligible for Section 4980H Transition Relief and is eligible for the 100 or More Relief, enter code B. An employer will not be eligible for both types of relief.
eSuite Tab
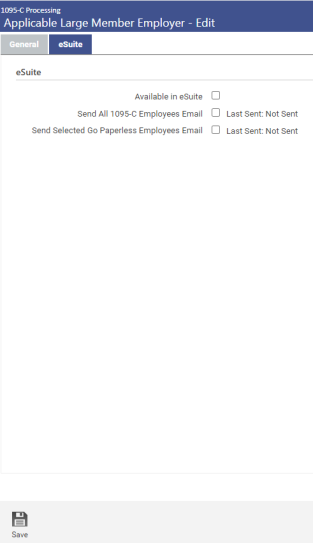
- Select the Available in eSuite check box if you want employees to be able to view and print their 1095-C forms from the eSuite HR Portal. Make sure 1095-Cs are ready to be viewed before selecting this box.
- Select the Send All W-2 Employees Email check box if you want all employees to receive emails informing them of the option in eSuite to have their W-2s delivered electronically.
-
Select Send Selected Go Paperless Email check box if you want all employees who choose the electronic delivery of W-2s to receive emails informing them that their W-2s are available in eSuite.
The email templates for these processes are located on the Email Template Setup page in Maintenance (Maintenance > new world ERP Suite > System > Email Templates).
Use the 1095-C Employee List page, accessed by clicking the  icon on the 1095-C Processing page, to review and maintain the employee information for your 1095-C forms and transmittal file:
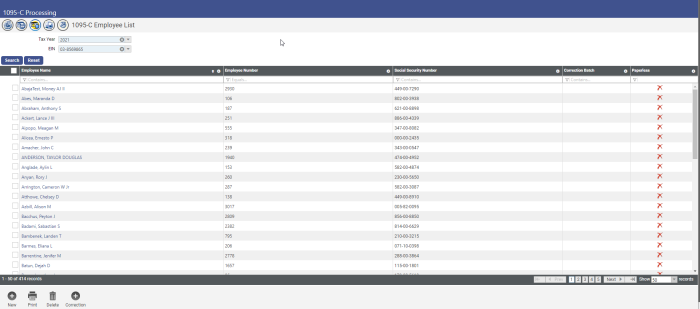
When the page first opens, a search is performed automatically based on the defaulted Tax Year and EIN, loading associated employee names in the grid below.
The far-right column, Paperless, identifies employees who are receiving W-2s electronically and those who are not. The column is populated based on whether employees have the Paperless W-2 check box selected in the Demographics section of the Workforce Administration Personal tab.
Employees who have the check box selected show a green check mark; employees who have it deselected show a red X. By default, the column shows both. To filter the column to show one or the other, click the filter icon at the top of the column and select Yes (green check mark) or No (red X). To show both, select Clear Filter.
- To load the list you want, select the appropriate Tax Year and EIN, and click the Search button.
- Select the Tax Year being processed. The drop-down contains all available years through the current year. The latest year containing data is the default selection. During the months of January through September, the previous year is defaulted. During October through December, the current year is defaulted.
-
Enter the nine-digit, state-assigned employer identification number (EIN). If multiple EINs have been saved, the first one in the list is the default selection. All ALE member EINs that exist for the Tax Year selected will display on the drop-down in alphanumeric order.
EIN is determined by an entry in the Company field on the Employment tab of Workforce Administration. The Value of the validation set entry contains the EIN. If a company is not specified as of the last day of the current tax year, the Federal Tax ID from Company Suite Settings is used.
Add or Edit Employee Information
Typically, employee information for 1095-C forms is loaded from Workforce Administration and Non-Employee Service; however, if you have an employee who is not in the system but needs to be reported to the IRS, click the New button below the grid to add the employee's information for your 1095-C forms and transmittal file. To edit an employee's information, click the Employee Name link in the grid. In either instance, the 1095-C Employee page will open.
This page contains three tabs: Employee and Employer Information, Employee Offer and Coverage and Covered Individuals.
Employee and Employer Information
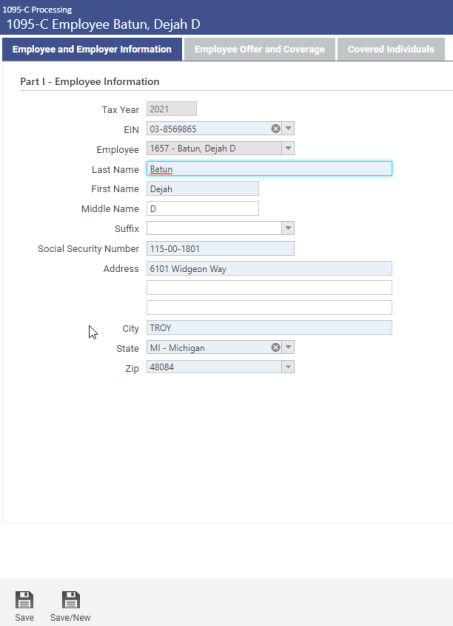
Use this tab to add or edit an employee's information for Part I of your 1095-C forms and transmittal file.
- Select the Tax Year. In edit mode, this field is disabled.
- Select the Employee (number and name).
- The employee's last, first, middle name and suffix are defaulted from the Name section of the Workforce Personal tab.
- The employee's nine-digit social security number is defaulted from the Demographics section of the Workforce Personal tab.
- The employee's address is defaulted from the Address section of the Workforce Personal tab.
- To save the information, click the Save button. To save the information and add another employee, click the Save/New button. All except the Tax Year and EIN fields will be cleared for entry.
Employee Offer and Coverage
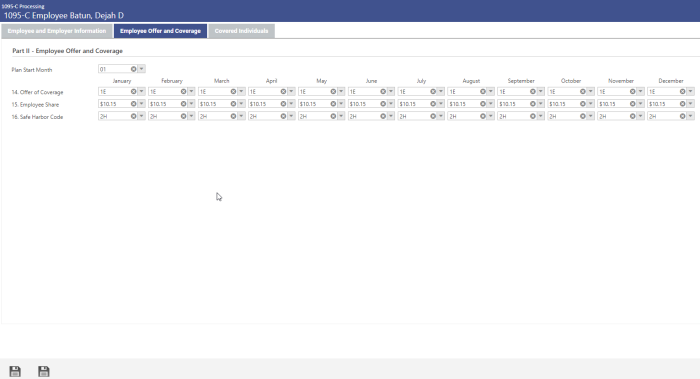
Use the grid on this tab to add or edit the monthly entries for an employee's offer and coverage information for Part II of your 1095-C forms and transmittal file.
- Plan Start Month: Although a plan start month may be selected at the Company HR Settings or Benefit Group level, this field gives you the option to override the plan start month for individual employees. Months correspond with numbers on the drop-down: January = 01, February = 02, March = 03, and so on.
- Offer of Coverage: This entry is defaulted from Workforce based on the one effective on the first day of the month. If you are selecting a code, it should be the code to be reported each month according to the IRS regulations. The available selections come from validation set 548. The drop-down shows codes and descriptions, although the cells in the grid show only the codes.
- Employee Share: This entry is defaulted from Workforce based on the one effective on the first day of the month. If you are selecting a code, it should be the code to be reported each month according to the IRS regulations. The available selections come from Maintenance > Human Resources > Affordable Care Act > Lowest Cost Premium. The drop-down shows codes and descriptions; cells in the grid show the associated dollar amounts. Each amount is the one that was effective dated as of the first day of the month being reported.
- Safe Harbor Code: This entry is defaulted from Workforce based on the one effective on the first day of the month. If you are selecting a code, it should be the code to be reported each month according to the IRS regulations. The available selections come from validation set 549. The drop-down shows codes and descriptions, although the cells in the grid show only the codes.
- To save the information, click the Save button. To save the information and add another employee, click the Save/New button. All fields on this tab and all fields except the Tax Year and EIN fields on the Employee and Employer Information tab will be cleared for entry.
Covered Individuals
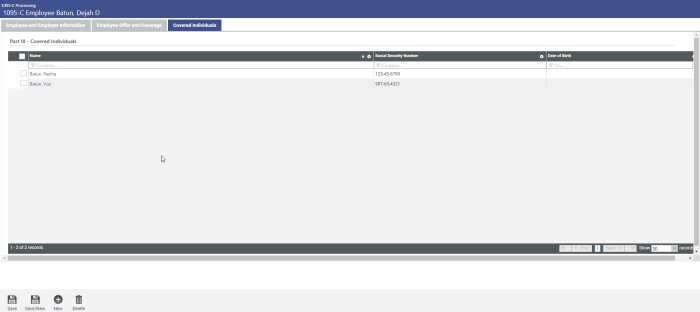
Use the grid on this tab to add or edit an employee's covered individuals' information for Part III of your 1095-C forms and transmittal file. The grid contains the names, social security numbers and dates of birth of the covered individuals.
Covered Individuals are flagged in two places in Workforce. Employees and dependents flagged in either location are considered to be covered individuals.
- In the Covered Individuals section of the Employer Reporting tab, included are any entries where the Start Date is less than or equal to the last day of the current tax year and the End Date is greater than or equal to the first day of the current tax year.
- In the Benefit Plans section of the Payroll Data tab, included are entries where the Coverage Start Date is less than or equal to the last day of the current tax year, and the Coverage End Date is greater than or equal to the first day of the current tax year, and the 6055 Reporting check box is selected on the associated plan.
Covered Individuals also may be flagged in the Non-Employee module. The Benefit Plans section of Non-Employee Service includes entries where the Coverage Start Date is less than or equal to the last day of the current tax year, the Coverage End Date is greater than or equal to the first day of the current tax year, and the 6055 Reporting check box is selected on the associated plan.
-
To add a covered individual, click the New button below the grid. To edit information for a covered individual, click the corresponding Name in the grid. In either instance, the 1095-C Employee page for the covered individual will open:
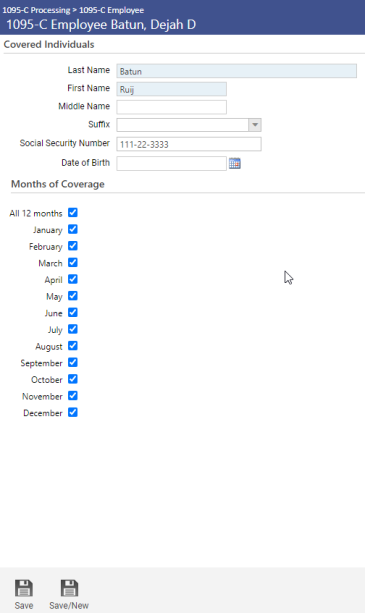
- Enter the covered individual's last, first, middle name and suffix.
- Enter the covered individual's nine-digit social security number. If blank, Date of Birth is required.
- Enter the covered individual’s date of birth, but only when the social security number is not known. When the system creates covered individual information, both fields are filled in, but the date of birth only will be used on the form and in the transmittal file when the social security number is not found.
-
Select Months of Coverage for those months in which the individual was covered for at least one day in the month; for example, if an entry on the Covered Individuals section of Workforce has a Start Date of 3/15/14 and an End Date of 7/21/14, the months of coverage for the selected contacts will default as March, April, May, June and July.
To select the check boxes for all months, select the All 12 Months check box. Deselecting the check box for an individual month will deselect the All 12 Months check box.
- To save the information, click the Save button. To save the information and clear the fields for the addition of another covered individual, click the Save/New button.
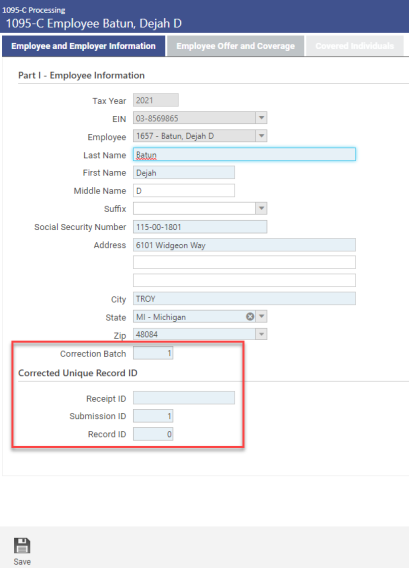
1095-C Correction
Selecting an employee from the 1095-C Employee List page and clicking the Correction button opens the 1095-C Employee page, where the Employee and Employer Information tab provides four additional fields—one for a correction batch number and three that, together, will create a unique ID for the corrected record:
Correction Batch defaults the highest existing correction batch number for all employees. (To allow for multiple entries, a sequence number has been added to the 1095-C Employee table to track corrections. The sequence number acts as a "correction batch number" to submit corrections to the IRS. More than one correction may be submitted at once, so the same batch number may be used for several employees.)
If the highest existing correction batch number is 0, the default is 1. Whole numbers up to three digits are permitted. This number may be edited when adding or editing a correction.
Multiple corrections may be made for one employee, as long as the corrections are in different batches.
An employee may not have more than one correction submitted at a time, so the batch number must be unique for the employee/tax year/EIN.
Corrected Unique Record ID fields: When submitting corrections to the IRS, the user must specify the ID of the record being corrected. The IRS identifies this data as the “CorrectUniqueRecordID.” The ID consists of three parts, each separated by a vertical bar (|)--for example, 1095C-17-00001234|12|98.
Receipt ID is issued by the IRS when a transmittal file is sent. Example: 1095C-15-00000953.
Submission ID identifies the company within the transmittal file. The default entry is 1. Whole numbers up to two digits are permitted.
Record ID identifies the employee within the company. Employees are numbered sequentially, beginning with 1. The default is blank. Whole numbers up to five digits are permitted.
When corrections are saved, the Receipt ID, Submission ID and Record ID are combined with a vertical bar (|) between each and saved as the IRSCorrectedUniqueRecordID (Example: 1095C-17-00001234|1|98), and rows representing the corrected records are inserted below the previous records on the 1095-C Employee List page, with the correction batch number displayed in the Correction Batch column.
1095-C Employee Register
-
To print the 1095-C Employee Register, a detailed report used to verify the employees’ setup, click the Print button at the bottom of the 1095 Employee List page. The 1095-C Register dialog will open:
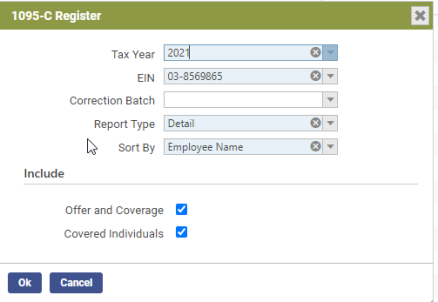
- Select the Tax Year for which the register is being generated.
- Select the nine-digit, state-assigned employer identification number (EIN) for which the report is being generated.
- The Correction Batch field is enabled when the Report Type selected is Detail. The register output will contain only the employee data that matches the correction batch number selected. The number will display to the right of the EIN. A Corrected Unique Record ID column will display to the right of the employees.
- Select the Report Type to run: Detail generates a list of all 1095-C employee information used to verify the employee’s setup. Audit generates a summary list of employees who meet certain criteria to help identify those who are set up incorrectly. Selecting Audit disables the Offer and Coverage and Covered Individuals check boxes.
- In the Sort by field, select how you want the register sorted: Employee Name sorts the register alphabetically by employee last names. Department sorts the register alphabetically by department names.
- To include offer and coverage information on the register, select Offer and Coverage. To exclude this information, deselect the box.
- To include covered individuals information on the register, select Covered Individuals. To exclude this information, deselect the box.
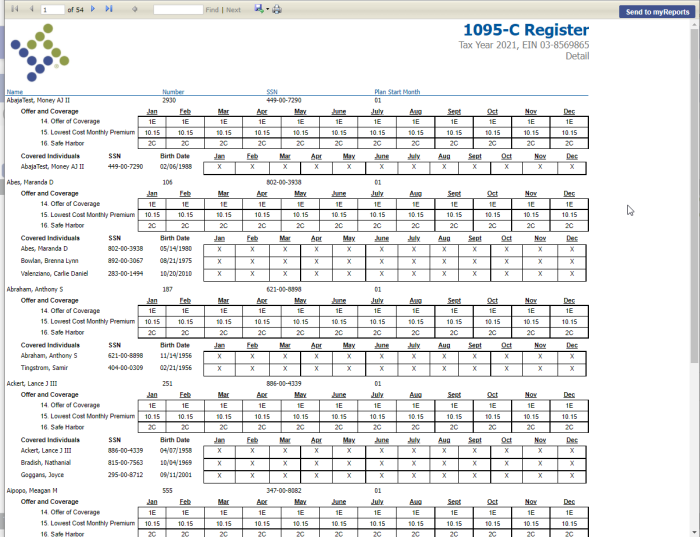
Sample Detail Register by Employee Name
Sample Detail Register by Department
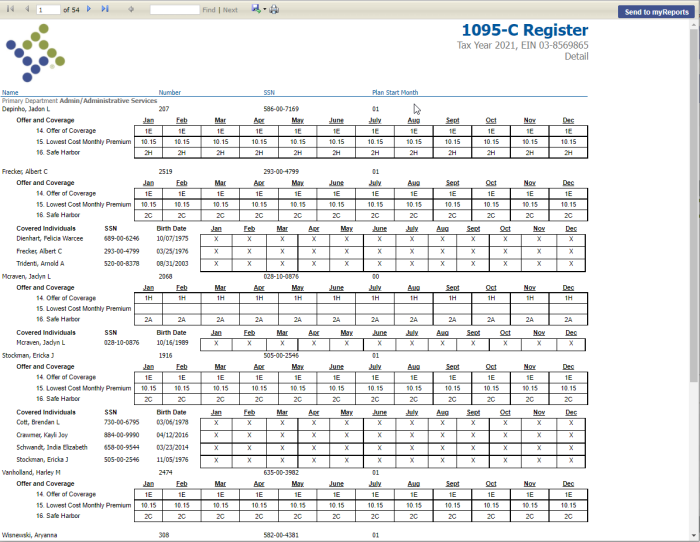
All data comes from the name, employment and primary job records effective as of 12/31 of the tax year.
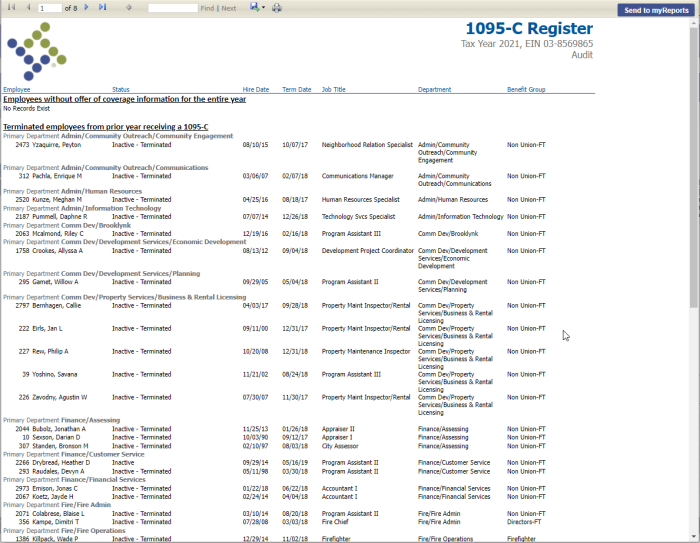
If your Report Type selection is Audit, the following three sections will appear on the register:
-
Active employees not receiving a 1095-C
This section should contain part-time employees without coverage for the entire year.
-
Terminated employees from prior years receiving a 1095-C
This section will contain employees on COBRA and covered retirees.
-
Employees without offer of coverage information for the entire year
This section should be blank, as it is not allowed by the IRS.
All three sections show the name and various other information to help identify the employee.
Sample 1095-C Register Audit
The Print 1095-C Forms page, accessed by clicking the  icon on the 1095-C Processing page, allows authorized users to generate official 1095-C forms.
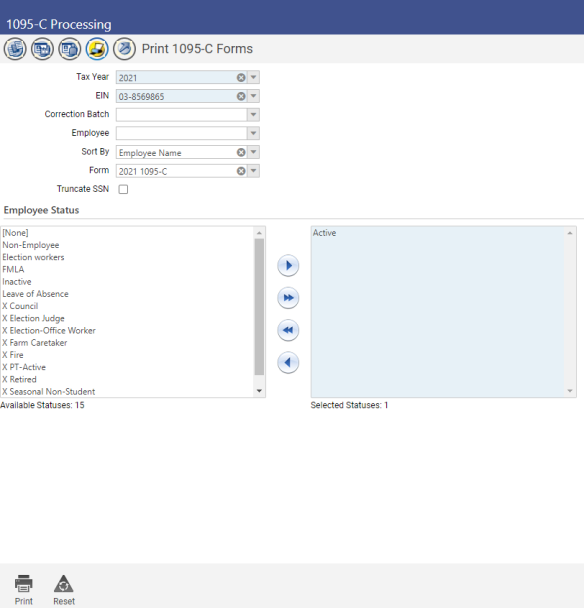
- Select the Tax Year. The current year is the default value.
- Select the EIN. This value defaults from the 1095-C Employee List page.
- If applicable, select the Correction Batch. The names on the Employee drop-down are filtered according to correction batch number, tax year and EIN. Only the 1095-C forms that match the selected correction batch number are generated. If the correction batch is selected, an X will appear in the Corrected box at the top of the 1095-C and 1095-C Z-Fold forms.
-
Leave the Employee field blank to generate 1095-Cs for all employees. Select the Employee if the 1095-C should be generated for only one employee.
Note: A 1095-C will not print for any employee who has elected to go paperless and has a primary email address set up in Workforce Administration; however, if an employee is selected in the Employee prompt, a 1095-C will print.
- In the Sort By field, select whether to generate 1095-C forms by Employee Name or Primary Department.
- Select the 1095-C Form that you want to use. This entry is required.
- In the Employee Status multi-select list boxes, select the status(es) for which 1095-Cs will be generated. You may use the list boxes to generate 1095-Cs for current employees to be distributed with paychecks separate from the 1095-Cs that need to be mailed to former employees.
-
Click Print to send the print file as a PDF to myReports.
The standard form will print on 8 ½” x 11” paper with no perforations.
The form prints “portrait” instead of “landscape” so that it fits into a window envelope.
A Z-Fold form also is available.
-
From myReports, click the 2021 1095-C link on the left side of the page. The forms will display on the right side of the page, allowing you to view the forms before printing:
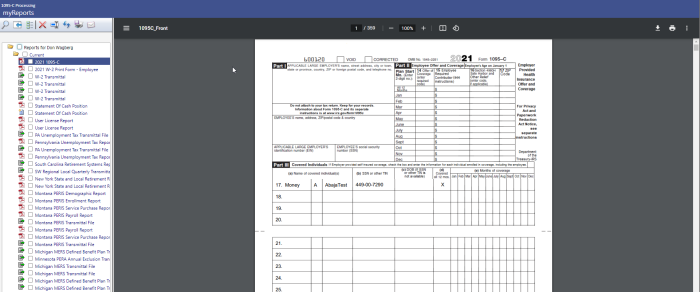
-
Click
 in the top border of the preview pane:
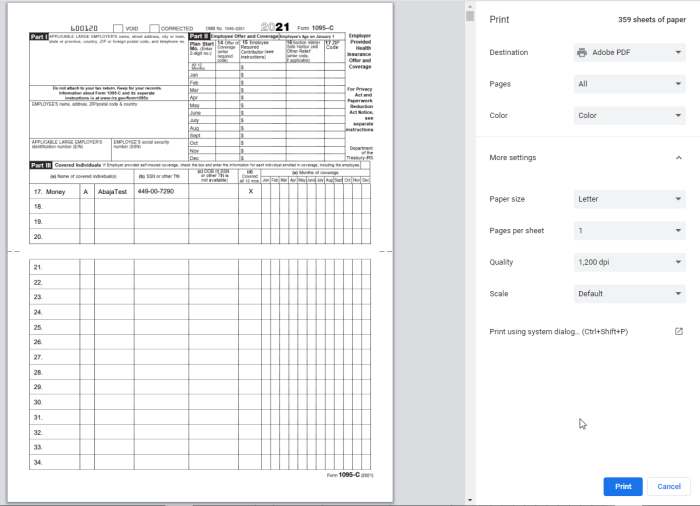
-
Select the appropriate print options.
Note: It is recommended that you first print one form to ensure the paper is loaded correctly in your printer before you print all forms.
- Click Print.
Print 1095-C Z-Fold Form
Note: The 1095-C Z-fold form must be printed on a network printer, due to additional printer setup that needs to be performed.
The Z-fold version of the 1095-C form prints on legal-size paper. Printing from new world ERP uses the default paper size for the printer you select, so unless that is the default for your printer, you will need to follow the steps below to change the network printer’s default paper size to Legal.
-
Connect to the server that houses the application server or the report server (if installed) by going to Start > Run and typing mstsc /console:
- In the Computer field, type the name of your server and click Connect.
- Log into the server using the administrator log in.
- Select Start > Devices and Printers or Start > Printers and Faxes.
- Right click the printer you will use to print the Z-fold 1095-C forms. Remember that it should be a network printer, not a local printer.
-
Select Printing Preferences from the menu. Set the default paper size to Legal. Below is an example for an HP PCL5 printer:
-
Click Apply to make the changes.
Note: The log-on user for the service must have rights to the printer that you will use to print the Z-fold forms. This setup has been performed if the printer is available for selection on the myReports page.
- You may print the 1095-C Z-fold forms from the Print 1095-C Forms page in new world ERP. Remember to select the 2021 1095-C Z-Fold option in the Form field. When you click the Print button at the bottom of the preview pane in myReports, the printer will expect legal-size paper to be used.
- Once the forms are printed, return your network printer to its default settings.
Note: Certain information required for the 1095-C transmittal file must be entered on your employer record prior to creating the transmittal file. If you have not set up these required fields on the Applicable Large Employer (ALE) Member List, you will receive an error when uploading your transmittal file to the IRS. Please review the sections on the Applicable Large Employer Member List and the 1095-C Employee List.
The Create 1095-C Transmittal page, accessed by clicking the ![]() icon on the 1095-C Processing page, allows authorized users to create electronic 1095-C XML files for submission to the federal government:
icon on the 1095-C Processing page, allows authorized users to create electronic 1095-C XML files for submission to the federal government:
![]()
- Select the Tax Year. The current year is the default value.
- Select the EIN. This value defaults from the 1095-C Employee List page.
- Enter the Transmitter Control Code. This is the number assigned by the IRS to uniquely identify the transmitter. This field is required.
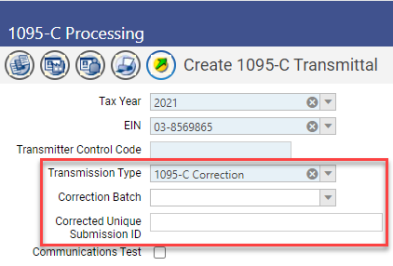
Select Original, Replacement, 1094-C Correction or 1095-C Correction for the Transmission Type. A replacement transmission should only be used when requested by the IRS.
Selecting 1094-C Correction adds a Corrected Unique Submission ID field to the page. Selecting 1095-C Correction adds the Correction Batch drop-down, which requires a selection. For the 1095-C correction, only the employees linked to the selected correction batch number are included in the transmittal file.
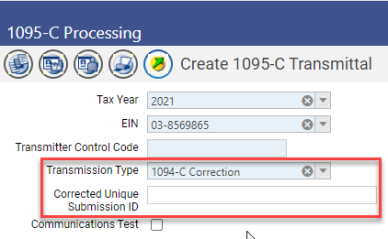
Note: The Corrected Unique Submission ID is a combination of the Receipt ID and Submission ID, using the pipe symbol (|) as a separator: ReceiptID|SubmissionID.
The following step (5) is not required for customers who have completed this step successfully in a prior year; it is required only for customers who are uploading 1095-Cs to the IRS for the first time:
-
To create a file you are required to send to the IRS as a communications test prior to sending your actual 1095-C electronic file, select the Communications Test check box. The files created for the communications test will not contain your actual data; they will contain test data required by the IRS. After you have sent those files to the IRS and passed the communications test, de-select this check box to create files containing your actual data.
Step summary for customers uploading 1095-Cs to the IRS for the first time:
- Create a transmittal file with the Communications Test check box selected.
- Upload the file to the IRS.
- Once the file is accepted, contact the IRS to have your account moved from test to production before creating data with the Communications Test check box deselected.
-
If the IRS requires a replacement file, an Original Receipt ID or Original Unique Submission ID will need to be entered:

-
Click the Create button. The following files will be sent to myReports:
- Validation Results for Manifest 1094-C Request
- Validation Results for 1094-C Request
- Manifest 1094-C Request
- 1094-C Request
-
For each validation report, click Open to check for errors. If either report contains errors, make corrections and recreate the transmittal files. Below are examples of common validation errors and what they mean:

This error indicates the Applicable Large Employer (ALE) was not updated. Contact information must be entered, along with any other information the IRS requires for the 1094-C. Please see the IRS instructions for additional details.

This error indicates an invalid Transmitter Control Code was entered when the transmittal file was created. Recreate the transmittal file, verifying the Transmitter Control Code is entered correctly.
Once both validation reports indicate "No errors found," the Transmission Data File 1094-C Request and the 1094-C Request are formatted correctly and may be sent to the IRS.
- Go to myReports. Click the 1094-C Request link on the left side of the page. You will be asked whether you want to open or save the file.
- Click the Save button to save the file to a folder on your computer where it may be located to upload to the IRS. Follow the same process for the Transmission Data File 1094-C Request file.
- Upload these files to the IRS.
- 1094-C/1095-C Instructions: https://www.irs.gov/pub/irs-pdf/i109495c.pdf
- IRS ACA Home page: https://www.irs.gov/affordable-care-act
- ACA Administration and End User Guide (online help)
Following is a list of the tasks to be performed in 1099-R processing. Following this list will help to ensure a smooth year-end process:
|
Daily Processing |
|
|
r |
Set up 1099 information on employee records. |
|
1099-R Processing |
|
|
r |
Order 1099-R forms. |
|
r |
For customers on the 2021 release, make sure to apply the year-end processing patch 2021.1.18.1. |
|
r |
Set up Box 7 codes. |
|
r |
Review the information on the1099 CompanyList. Review the 1099 List for any employee whom you feel may have incorrect 1099 data. |
|
r |
Generate the 1099-R work file using Create 1099 Data. |
|
r |
Print and review the 1099 Register. |
|
r |
Compare the 1099 Register to the Quarterly Wage Report and the Earnings Register. |
|
r |
Print 1099 Forms. |
|
r |
Create the transmittal file for submission to the IRS. |
|
r |
Distribute 1099-R forms to employees. |
|
r |
Submit the 1099-R information to the IRS. |
|
Other Payroll Year-End Procedures |
|
|
r |
Set up taxes as needed for the new year. |
Before beginning 1099 year-end processing, you should review the Company Information.
Maintenance > new world ERP Suite > System > Company Suite Settings> Company tab
Verify that the following fields on the Company tab are set up correctly:
- Company Name
- Address Line 1
- City
- State
- Zip
- Federal Tax ID
- State Tax ID
- ACH Company Name
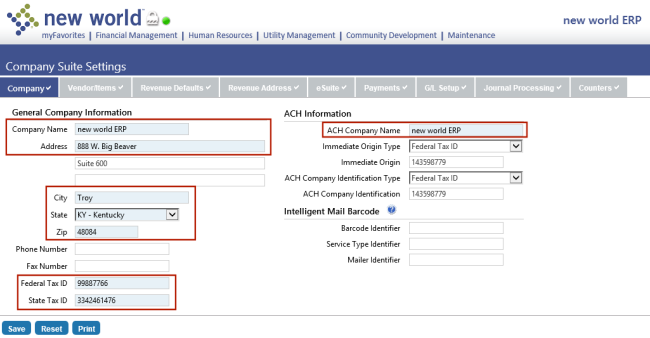
When the Create 1099 Data function is run from the 1099 Processing page, it will pull this information into the 1099 Company Information page. Make any necessary corrections and save the settings.
Human Resources > Workforce Administration > Search > Employee > Employment
To set up an employee who has a 1099-R instead of a W-2, check the 1099 box on the Employment tab.
An employee who was paid should show up under the Federal Tax ID specified in new world ERP Company Suite Settings. If you select a Company on the Employment tab, the employee should show up under the tax ID associated with the company.
The information on the minimum dollar amount that is required to create a 1099 may be found in the company record in Year-End Processing.
Human Resources > Year-End Processing > 1099 Processing
-
Select the
 icon to display the 1099 Company List:
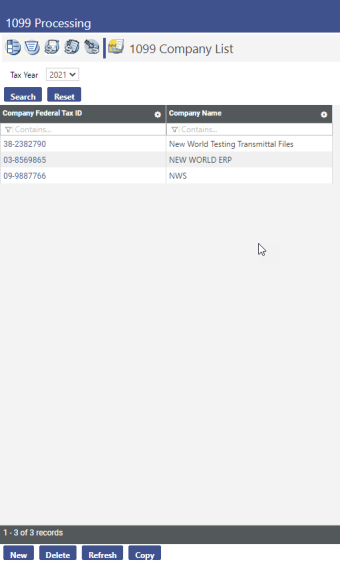
- Click the Company Federal Tax ID hyperlink to open the record:
-
Click the 1099 Types tab:
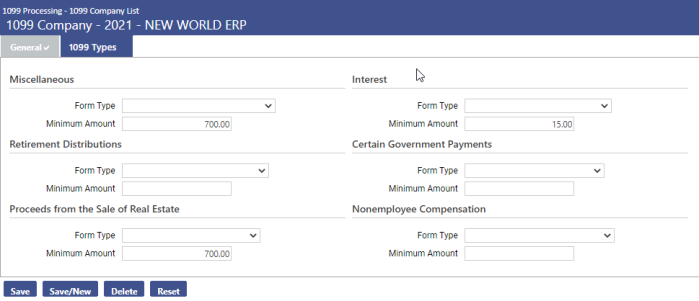
- For Retirement Distributions (1099-R), select the Form Type you plan to use.
- In the Minimum Amount field, enter the minimum dollar value for which a 1099 should be created. The minimum dollar value is evaluated against all amount fields on the 1099-R. If this field is left blank, a 1099 will be generated for any amount paid to a 1099 employee.
- Click Save to retain the values.
No special setup is required if your organization uses new world standard forms. The year-end update will include all the necessary form information.
No special setup is required for the transmittal file. The year-end update will include all the necessary information.
Human Resources > Year-End Processing > 1099 Processing
Once the proper records have been set up and the year’s daily processing is complete, users can begin the task of processing 1099s.
The 1099 Setup page allows authorized users to associate hours codes with each distribution type.
-
Select the
 icon to display the 1099 Setup page. (This page is the default when opened from the Human Resources main menu.)
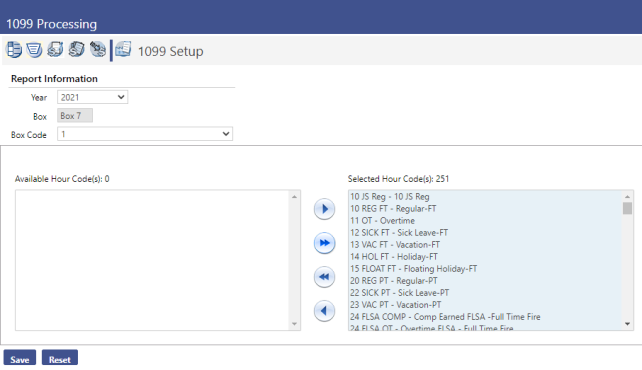
- Select the tax Year. The current year is the default selection.
- Click in the Box Code field to select from a list of available distribution codes for Box 7.
- For each Box Code, select the associated hours code(s) from the Available Hour Code(s) multi-select list box and move it to the Selected Hour Code(s) list box.
The Create 1099 Data process creates data based on the Box 7 code associated with the hours codes paid to an employee. If an employee has wages for hours codes with two different Box 7 codes, two different 1099 records are created.
The 1099 Register breaks down the totals based on the code entered in Box 7.
Human Resources > Year-End Processing > 1099 Processing
-
Select the
 icon to display the 1099 List page. The current year will default in the Tax Year field. Once the user selects a Company Federal ID, 1099 data can be created.
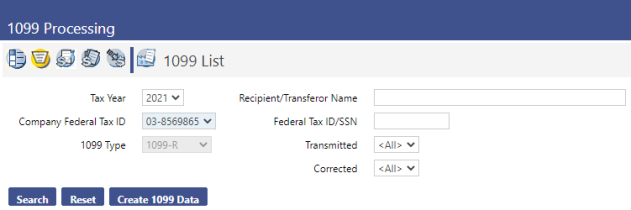
- Select the Tax Year. The current year is the default value. 1099 data can be created for previous tax years.
- Select the Company Federal Tax ID. This field is required. The company’s tax ID(s) will populate the drop-down field.
- Select the 1099 Type. This field is populated with 1099-R and disabled.
- The Recipient/Transferor Name field allows you to search for a 1099 for a recipient who is not a retiree. The value can contain up to 192 characters.
- The Federal Tax ID/SSN field is another option that allows you to search for a 1099 for a recipient who is not a retiree. It can be used with the Recipient/Transferor Name field or by itself.
-
Click Create 1099 Data. The Create 1099 pop-up appears:
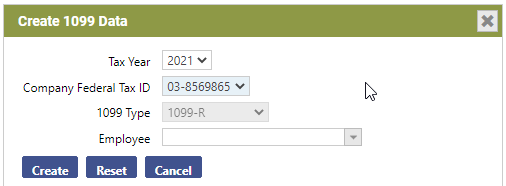
- The Tax Year and 1099 Type selected on the previous page are displayed as defaults on this page. Leave the Employee field blank to create 1099s for all employees.
- Click Create.
- If 1099 data already exists for the employees, the user will see the message, “1099 Data exists for selected employee(s). Overwrite this data?”
- Click Cancel once the data is created. This will close the pop-up and return the user to the 1099 List page.
Searching for 1099 Data
Once the 1099 data has been created, it can be viewed on the 1099 List page.
- Make sure the Tax Year, Company Federal ID and 1099 Type fields have the values they contained when 1099 data was created.
-
Click Search. The list of 1099 employees will appear on the page:
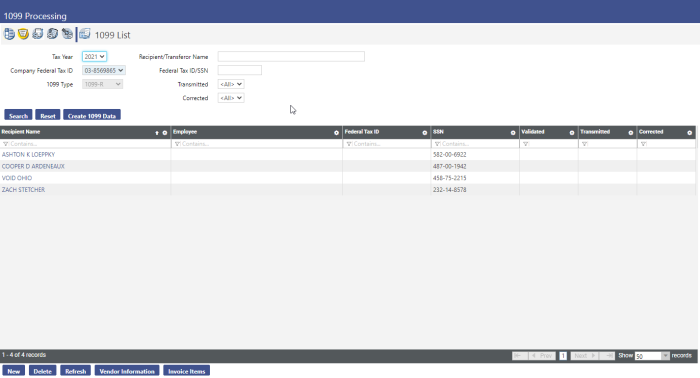
- Employees can be maintained as needed from this list.
Using the 1099 List
The 1099 List (shown above) displays the following employee information:
- Recipient Name
- Employee
- Federal Tax ID
- SSN
- Validation Status
Each page of this list may contain 50 employees. Users can scroll through the current page and use the  ,
,  , or
, or  options at the bottom of the list to navigate among the pages. The segment of the list being displayed and the total number of employees returned by the search displays at the bottom left of the page:
  .
.
Sorting the 1099 List
The 1099 List by default is sorted by Primary Contact in ascending alphabetical order. The list can be sorted by any other column simply by clicking on the column header of the column the user wishes to use as the new primary sort criterion. To re-sort the list in descending order, click the same column heading again.
Modifications to the sort order are retained only for the current page session. If the user closes the session or navigates to another page using one of the buttons at the bottom of the page, the page will return to the default sort order.
Modifying 1099 Form Information
Once 1099 Data is created, the user can view the data created for a particular employee and edit it as needed.
-
On the 1099 List page, click the Recipient Name hyperlink for the employee record you want to view. The 1099 Retirement Income page will open, defaulted to the General tab:
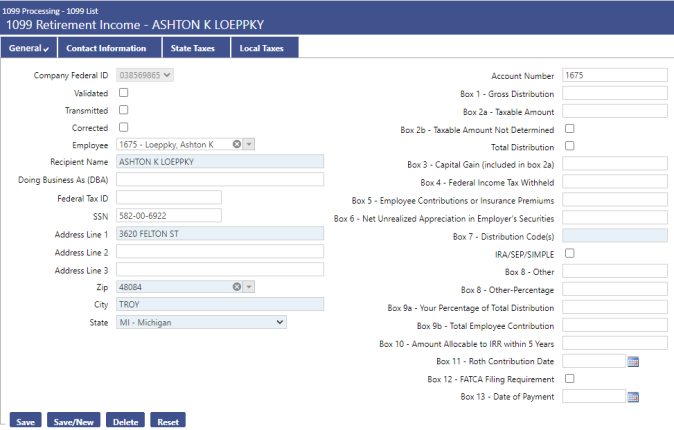
- All the information except the tax ID can be edited as needed. Click Save when all changes are complete. The updates will be saved to the 1099 file.
Adding an Employee to the List
If there are other employees who need to receive a 1099, the user can add them to the 1099 list.
-
From the 1099 List page, click the New button. The 1099 Retirement Income page will open, defaulted to the General tab:

- If the Validated check box selected, it indicates to the user that it has been confirmed that this should be a 1099-R rather than a W-2. This field is for information purposes only.
- If you are adding an employee, select the name from the Employee field. You can type part of the name in this field to filter the available values. Once you select the employee, the name and address information from the employee record will populate the fields on this page.
- If you are adding a non-employee to the list, enter their name using the Recipient Name field.
- If applicable, the Doing Business As (DBA) field contains the name under which the company is conducting business.
- Either a Federal Tax ID or an SSN must be provided before the record can be saved.
- Populate the Address Line 1, either the Federal Tax ID or the SSN, and Zip Code fields. The Zip Code value will populate the City and State fields.
- Populate the appropriate 1099 boxes with the amounts that should appear on the 1099.
- When you click Save, the employee will now be part of the 1099 List. A 1099 will be created for the amounts you specified, but this person will not be flagged as a 1099 employee.
Deleting an Employee from the List
If an employee is no longer a 1099 employee, he or she can be deleted from the 1099 List. To do this,
- Go to the employee record for the employee you want to delete from the 1099 List.
- Go to the User-Defined attribute for the employee.
- Blank out the 1099-R user-defined value and click Save. The employee will now receive a W-2 when Create W-2 Data is run.
- Go to the 1099 List. Highlight the employee and click the Delete button. The employee has now been removed from the 1099 List.
Human Resources > Year-End Processing > 1099 Processing
The 1099 Register will show all the transactions for each 1099 employee, sub-totaled by employee. All transactions are listed in this report, which includes transactions for employees that did not exceed the minimum amount required to print a 1099. This report allows users to verify the inclusion of all valid 1099 transactions and also the exclusion of non-1099 transactions.
-
Select the 1099 Register icon
 from 1099 Processing:
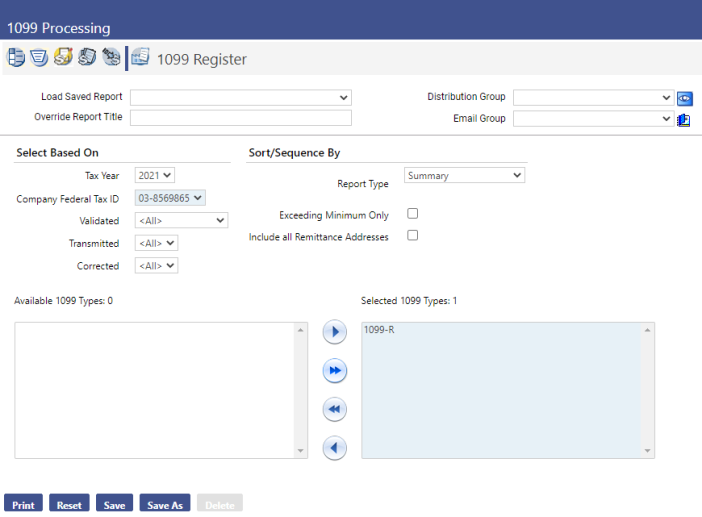
- Select the Tax Year. The current year is the default value.
- Select the Company Federal Tax ID. This field is required. Many organizations will have only one Company Federal Tax ID, but in the case of a multi-company scenario, the register may be run for only one company at a time.
-
Select the Report Type. The options are Detail, Detail with G/L Distributions, Summary and User Adjustments. Summary is selected by default.
- If Summary is selected, the report will display the contact’s Name, Number and Address information, plus the box totals for the employee’s 1099.
- If User Adjustments is selected, the report will display only those employees whose 1099 information has been adjusted for the 1099 type(s) selected. It displays the employee’s Name and Number, the Box Number where the value was changed, the Original Amount, the Amount on 1099 and the Adjusted Amount.
- Determine whether Exceeding Minimum Only should be selected. This check box is cleared by default. If it is left cleared, 1099 transactions for all employees, regardless of the amount, will appear on the register. If the check box is selected, only employees whose transactions exceed the minimum amount required to print a 1099 will appear on the register.
- Select the 1099 types that should be included on the register. Type 1099-R must be selected. Click the type and click the Add button to add 1099-R.
- Click Print to run the 1099 Register.
- If you want to save the report criteria, click the Save button and provide a name for the report. Then click the Print button. The 1099 Register will be sent to myReports.
- Compare the report results to the Quarterly Wage Report and the Earnings Register.
Print Directly on Blank Stock Forms
Organizations must use IRS Blank Stock tax forms to print 1099s. When printed, the 1099 Blank form types available in new world ERP are replicas of the IRS forms.
It is recommended that you test print one form to ensure the paper is loaded correctly in your printer before you mass print all forms. In addition, the 1099 tax forms are now automatically saved as Adobe Acrobat PDF files in the system when generated.
Note: Special instructions for printing the 1099-R Z-fold form appear at the end of this section.
The 1099 Forms page allows users to specify the 1099 form to be printed and then print the actual 1099s to send to the employees.

- Select the Tax Year. The current year is the default value.
- Select the Company Federal Tax ID. This field is required. Many organizations will have only one Company Federal Tax ID, but in the case of a multi-company scenario, the forms may be printed for only one company at a time.
- Select the 1099 Type. 1099-R is the only option and is selected by default.
- Select the Form Type. This field is required. The available types will vary.
- Select the Truncate SSN check box if the number should be truncated for security purposes when it is printed. The Truncate SSN check box will appear for Blank Copy C and Blank Copy Z-Fold forms only.
- Determine whether Exceeding Minimum Only should be selected. This check box is selected by default. If it left selected, only employees whose transactions exceed the minimum amount required to print a 1099 will be printed. If the check box is cleared, 1099 transactions for all employees, regardless of the amount, will be printed.
- Leave the Employee field blank to print 1099s for all employees. Select the Employee if 1099s should be printed for only one employee.
- The Recipient/Transferor Name field allows you to print a 1099 for a recipient who is not a vendor. The value can contain up to 192 characters.
- The Federal Tax ID/SSN field is another option that allows you to print a 1099 for a recipient who is not a vendor. It can be used with the Recipient/Transferor Name field or by itself.
- Click Print to send the print file to myReports.
-
Go to myReports. Click a 2021 1099 Form link on the left side of the page. Only the tax values for the 1099 form appear on the screen and can be reviewed before you print the form.
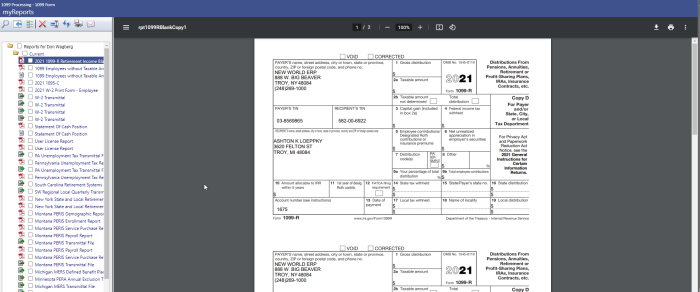
- Load the appropriate blank IRS tax forms into your printer based on the form type you are printing.
-
Click
in the Adobe toolbar at the top of the preview pane to print the form: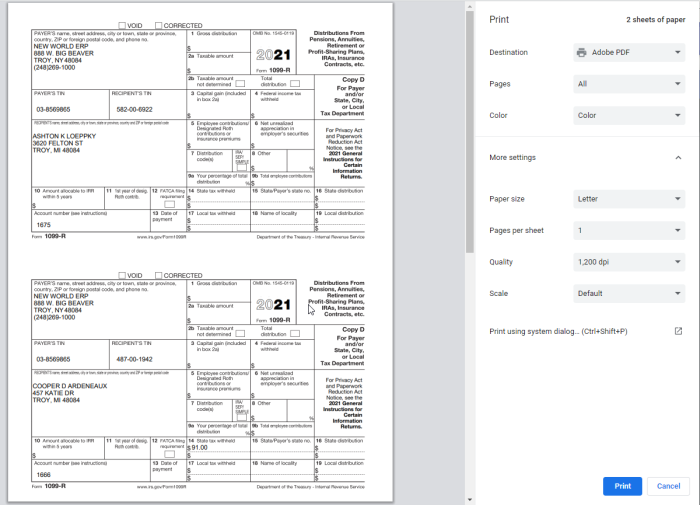
-
Select the appropriate print options.
Note: It is recommended that you first print one form to ensure the paper is loaded correctly in your printer before you print all forms.
- Click Print.
1099-R Z-fold Form for 2021 Tax Year
The Z-fold version of the 1099-R form prints on legal-size paper. Printing from new world ERP uses the default paper size for the printer you select, so unless that is the default for your printer, you need to change the network printer’s default paper size to Legal.
-
Click
in the top border of the preview pane to print the form: - Select the appropriate print options.
-
Under More Settings, select a Paper size of Legal:
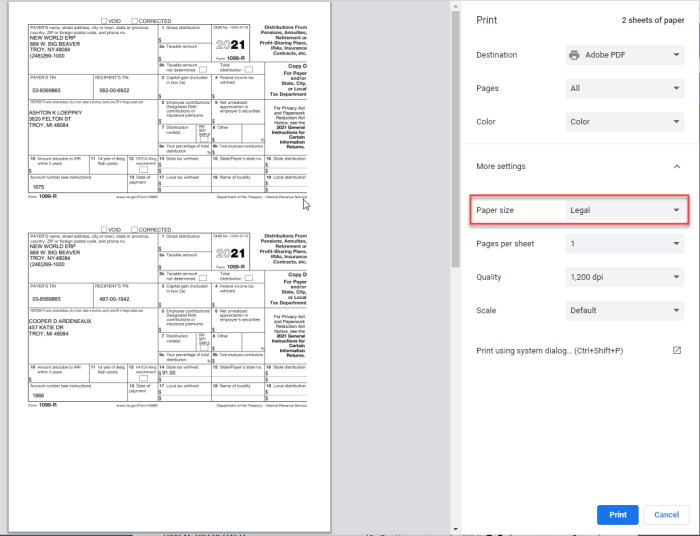
-
Adjust the other print options as needed and click OK.
Warning: After you print your 1099 forms, be sure to return your printer setup to the previous default settings. Otherwise, new world ERP data you print may not be in the intended format.
Print 1099-R Z-Fold Form for Years Prior to 2009
Note: The 1099-R Z-fold form must be printed on a network printer, due to additional printer setup that needs to be performed.
The Z-fold version of the 1099-R form prints on legal-size paper. Printing from new world ERP uses the default paper size for the printer you select, so unless that is the default for your printer, you will need to follow the steps below to change the network printer’s default paper size to Legal.
-
Connect to the server that houses the application server or the report server (if installed) by going to Start > Run and typing mstsc /console:
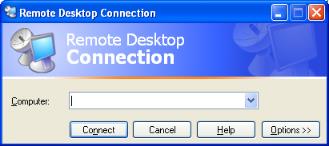
- In the Computer field, type the name of your server and click Connect.
- Log into the server using the administrator log in.
- Select Start > Devices and Printers or Start > Printers and Faxes.
- Right click the printer you will use to print the Z-fold 1099-R forms. Remember that it should be a network printer, not a local printer.
-
Select Printing Preferences from the menu. Set the default paper size to Legal. Below is an example for an HP PCL5 printer:
-
Click Apply to make the changes.
Note: The log-on user for the service must have rights to the printer that you will use to print the Z-fold forms. This setup has been performed if the printer is available for selection on the myReports page.
- You can now print the 1099-R Z-fold forms from the 1099 Form page in new world ERP. Remember to select the 1099-R Blank Z-Fold option in the Form Type field. When you select the Print button at the bottom of the preview pane in myReports, the printer will expect legal-size paper to be used.
- Once the forms are printed, return your network printer to its default settings.
The 1099 Transmittal page allows users to create an electronic 1099 file to send to the IRS.
![]()
- Select the Tax Year. The current year is the default value.
- Select the Company Federal Tax ID. This field is required. Many organizations will have only one Company Federal Tax ID, but in the case of a multi-company scenario, the transmittal file may be created for only one company at a time.
- Enter the Payer Name Control. This code identifies the payer and may contain up to 80 characters. It is provided by the IRS.
- Enter the Transmitter Control Code. This field is required to transmit 1099s. This code is also provided by the IRS and is five characters long.
- Determine whether Exceeding Minimum Only should be selected. This check box is selected by default. If it is left selected, only employees whose transactions exceed the minimum amount required to print a 1099 will be transmitted. If the check box is cleared, 1099 transactions for all employees, regardless of the amount, will be transmitted.
- Enter the Name. This is the name of the person at the organization that the IRS should contact if there are concerns about the transmittal file. The name is required; it may contain up to 40 characters.
- Enter the Phone number. This is the phone number of the person at the organization that the IRS should contact if there are concerns about the transmittal file. The phone number is required; it may contain 10 characters.
- Enter the Email address. The contact’s email address may contain up to 35 characters.
- Click the Create button. The transmittal file will be sent to myReports.
-
Go to myReports. Click the 2021-1099 Transmittal link on the left side of the page. You will see a page like the following:
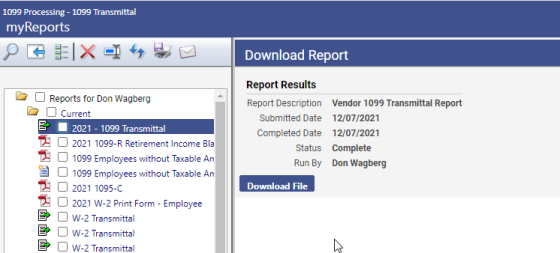
- Click the Save button and save the file to a folder on your computer where it can be located to send to the IRS.